Konica Minolta bizhub 4750 bizhub 4750/4050 Applied Functions User Guide - Page 64
[WebDAV Settings] - [WebDAV Client Settings], [OpenAPI Settings]
 |
View all Konica Minolta bizhub 4750 manuals
Add to My Manuals
Save this manual to your list of manuals |
Page 64 highlights
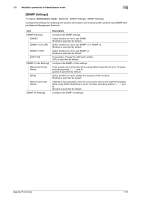
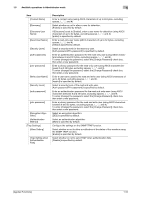
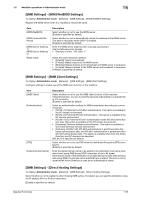
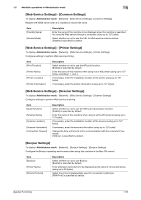
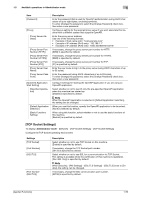
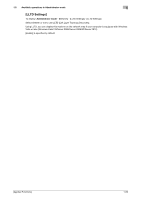
1.5 Available operations in Administrator mode 1 Tips To use the Internet fax function, the optional Fax Kit FK-512 and Mount Kit MK-P03 are required. [WebDAV Settings] - [WebDAV Client Settings] To display: Administrator mode - [Network] - [WebDAV Settings] - [WebDAV Client Settings] Configure settings to enable use of the WebDAV client function of this machine. Item [WebDAV Client] [Proxy] [Proxy Server Address] [Proxy Server Port Number] [Proxy Server User Name] [Proxy Server Password] [Connection Timeout] [Authentication] [Domain Name] Description Select whether or not to use the WebDAV client function of this machine. Selecting this option sends the scanned original data to the WebDAV server. [Enable] is specified by default. To access to the WebDAV server via a proxy server, register your proxy server. To access to the WebDAV server via a proxy server, enter the proxy server address. Use one of the following formats. • Example of host name entry: "host.example.com" • Example of IP address (IPv4) entry: "192.168.1.1" • Example of IP address (IPv6) entry: "fe80::220:6bff:fe10:2f16" If necessary, change the proxy server port number. [8080] is specified by default. Enter the user name to log in to the proxy server (using ASCII characters of up to 63 bytes). Enter the password (using ASCII characters of up to 63 bytes). To enter (change) the password, select the [Change Password] check box, then enter a new password. If necessary, change the time-out time to limit a communication with the WebDAV server. [60] sec. is specified by default. Select an authentication method for WebDAV transmission according to your environment. Enter the default domain name to be added to the destination host name when data is sent using WebDAV (using ASCII characters of up to 64 bytes). [OpenAPI Settings] To display: Administrator mode - [Network] - [OpenAPI Settings] - [OpenAPI Settings] To use application software that communicates with this machine via OpenAPI, configure the OpenAPI settings of this machine. Item [OpenAPI] [OpenAPI External] [Port Number] [SSL/TLS] [Port Number (SSL/TLS)] [Authentication] [Login Name] Description Select whether or not to use OpenAPI on this machine. [Enable] is specified by default. Select whether or not to connect to external application software via OpenAPI. [Enable] is specified by default. If necessary, change the OpenAPI communication port number. [50001] is specified by default. Select whether or not to use SSL for a communication via OpenAPI. This setting is available when the certification of this machine is registered. [Non-SSL Only] is specified by default. If necessary, change the SSL communication port number. [50003] is specified by default. Select whether or not to authenticate users accessing via OpenAPI. To authenticate, enter the login name and password in [Login Name] and [Password]. [Off] is specified by default. Enter the login name that is used for OpenAPI authentication (using ASCII characters of up to eight bytes, excluding symbols). [Applied Functions] 1-58
-
 1
1 -
2
-
3
-
4
-
5
-
6
-
7
-
8
-
9
-
10
-
11
-
12
-
13
-
14
-
15
-
16
-
17
-
18
-
19
-
20
-
21
-
22
-
23
-
24
-
25
-
26
-
27
-
28
-
29
-
30
-
31
-
32
-
33
-
34
-
35
-
36
-
37
-
38
-
39
-
40
-
41
-
42
-
43
-
44
-
45
-
46
-
47
-
48
-
49
-
50
-
51
-
52
-
53
-
54
-
55
-
56
-
57
-
58
-
 59
59 -
 60
60 -
 61
61 -
 62
62 -
 63
63 -
 64
64 -
 65
65 -
 66
66 -
 67
67 -
 68
68 -
 69
69 -
70
-
71
-
72
-
73
-
74
-
75
-
76
-
77
-
78
-
79
-
80
-
81
-
82
-
83
-
84
-
85
-
86
-
87
-
88
-
89
-
90
-
91
-
92
-
93
-
94
-
95
-
96
-
97
-
98
-
99
-
100
-
101
-
102
-
103
-
104
-
105
-
106
-
107
-
108
-
109
-
110
-
111
-
112
-
113
-
114
-
115
-
116
-
117
-
118
-
119
-
120
-
121
-
122
-
123
-
124
-
125
-
126
-
127
-
128
-
129
-
130
-
131
-
132
-
133
-
134
-
135
-
136
-
137
-
138
-
139
-
140
-
141
-
142
-
143
-
144
-
145
-
146
 |
 |
