Konica Minolta bizhub 501 bizhub 361/421/501 Security Function User Manual - Page 91
Setting the Flash Memory Lock Password
 |
View all Konica Minolta bizhub 501 manuals
Add to My Manuals
Save this manual to your list of manuals |
Page 91 highlights
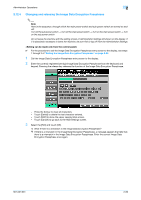
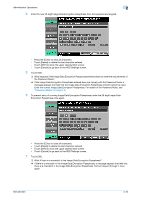
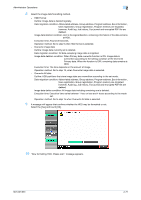
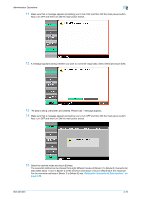
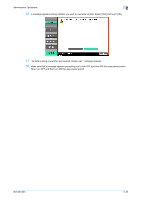
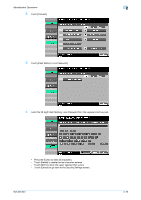
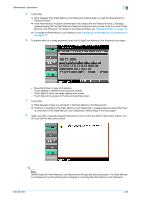
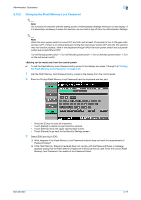
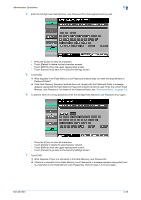
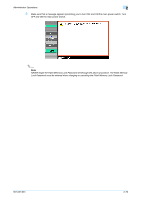
Administrator Operations 2 2.13 2.13.1 Protecting Data Stored in the Flash Memory The administrator settings in this machine allow setting or changing the Flash Memory Lock Password that is used to authenticate the Administrator of the machine. Should the flash memory be removed unawares, the Flash Memory Lock Password locks the flash memory protecting data contained in it. The Flash Memory Lock Password entered is displayed as "*." 2 Note Set unique password for Flash Memory Lock Password. Do not set any number that can easily guessed from birthdays, employee identification numbers, and the like for Flash Memory Lock Password. Change the Flash Memory Lock Password at regular intervals. Make sure that nobody but the Administrator of the machine comes to know the Flash Memory Lock Password. 2 Note When the Flash Memory Lock Password is set, flash memory verification is carried out when the machine is started. If the flash memory is illegally replaced with another and the flash memory cannot be unlocked by the Flash Memory Lock Password, the machine sounds an alert and stops booting while displaying an hourglass icon on the control panel. If the flash memory does not have the Flash Memory Lock Password setting, the control panel displays Service Call "SC-D303", a message that tells there is a mismatch between the flash memory and the Flash Memory Lock Password. The flash memory has the following function. Even if the flash memory is illegally removed or replaced with another, detection of a wrong Flash Memory Password five consecutive times will lock the authentication function. Leak of data can thus be prevented. Setting the Flash Memory Lock Password 2 Note When the main power switch is turned OFF and ON, wait at least 10 seconds to turn it ON again after turning it OFF. If there is no interval between turning the main power switch OFF and ON, the machine may not function properly. Here is the sequence through which the main power switch and sub power switch are turned ON and OFF. Here is the sequence, through which the main power switch and sub power switch are turned on and off: Turn off the sub power switch → Turn off the main power switch → Turn on the main power switch → Turn on the sub power switch Do not leave the machine with the setting screen of Administrator Settings left shown on the display. If it is absolutely necessary to leave the machine, be sure first to log off from the Administrator Settings. 0 For the procedure to call the Security Settings menu to the display, see steps 1 and 2 of "Setting the Enhanced Security Mode" on page 2-11. 1 Call the Security Settings to the screen from the control panel. 501/421/361 2-74
-
 1
1 -
2
-
3
-
4
-
5
-
6
-
7
-
8
-
9
-
10
-
11
-
12
-
13
-
14
-
15
-
16
-
17
-
18
-
19
-
20
-
21
-
22
-
23
-
24
-
25
-
26
-
27
-
28
-
29
-
30
-
31
-
32
-
33
-
34
-
35
-
36
-
37
-
38
-
39
-
40
-
41
-
42
-
43
-
44
-
45
-
46
-
47
-
48
-
49
-
50
-
51
-
52
-
53
-
54
-
55
-
56
-
57
-
58
-
59
-
60
-
61
-
62
-
63
-
64
-
65
-
66
-
67
-
68
-
69
-
70
-
71
-
72
-
73
-
74
-
75
-
76
-
77
-
78
-
79
-
80
-
81
-
82
-
83
-
84
-
85
-
 86
86 -
 87
87 -
 88
88 -
 89
89 -
 90
90 -
 91
91 -
 92
92 -
 93
93 -
 94
94 -
 95
95 -
 96
96 -
97
-
98
-
99
-
100
-
101
-
102
-
103
-
104
-
105
-
106
-
107
-
108
-
109
-
110
-
111
-
112
-
113
-
114
-
115
-
116
-
117
-
118
-
119
-
120
-
121
-
122
-
123
-
124
-
125
-
126
-
127
-
128
-
129
-
130
-
131
-
132
-
133
-
134
-
135
-
136
-
137
-
138
-
139
-
140
-
141
-
142
-
143
-
144
-
145
-
146
-
147
-
148
-
149
-
150
-
151
-
152
-
153
-
154
-
155
-
156
-
157
-
158
-
159
-
160
-
161
-
162
-
163
-
164
-
165
-
166
-
167
-
168
-
169
-
170
-
171
-
172
-
173
-
174
-
175
-
176
-
177
-
178
-
179
-
180
-
181
-
182
-
183
-
184
-
185
-
186
-
187
-
188
-
189
-
190
-
191
-
192
-
193
-
194
-
195
-
196
-
197
-
198
-
199
-
200
-
201
-
202
-
203
-
204
-
205
-
206
-
207
-
208
-
209
-
210
-
211
-
212
-
213
-
214
-
215
-
216
-
217
 |
 |