Konica Minolta bizhub PRESS C1070/C1070P bizhub PRESS C1070/C1070P/C1060/bizhu - Page 104
Convenient Use of Scan Function (Scan to SMB), Step 1: Prepare the destination computer
 |
View all Konica Minolta bizhub PRESS C1070/C1070P manuals
Add to My Manuals
Save this manual to your list of manuals |
Page 104 highlights
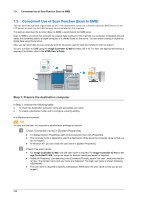
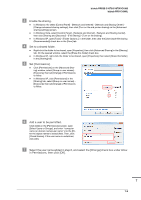
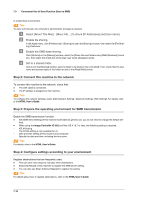
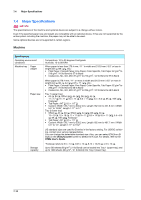
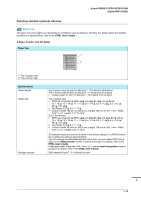
7.3 Convenient Use of Scan Function (Scan to SMB) 7.3 Convenient Use of Scan Function (Scan to SMB) You can send the scanned original data as an E-mail attachment, send it to a shared computer (SMB server) or the FTP server, or save it to the USB memory device installed on this machine. This section describes the function (Scan to SMB) to send data to the SMB server. Scan to SMB is a function that converts the original data scanned on this machine to a computer-compatible file and sends the converted data to a target computer or a shared folder on the server. You can store a handout original as digital data using this function. Also, you can send data to your computer and the file server used for daily file transfer in order to share it. To carry out Scan to SMB using the Image Controller IC-602 and Mac OS X 10.7 or later, the appropriate setting is required. For details, refer to the HTML User's Guide. Step 1: Prepare the destination computer In Step 1, execute the following tasks: - To check the destination computer name and accessible user name. - To create a destination folder and to configure a sharing setting. In a Windows environment. Tips Tips To carry out this task, the computer's administrator privilege is required. " Check [Computer name] in [System Properties]. - To display [System Properties], right-click [Computer], then click [Properties]. - The computer name is required to specify a destination. Write down the computer name so that you do not forget it. - In Windows XP, you can check the user name in [System Properties]. # Check the user name. - For Image Controller IC-602, only the user name is required. For Image Controller IC-415 or Image Controller IC-308, "computer name (or domain name)\user name" is required. - Select [All Programs] - [Accessories], click [Command Prompt], type in "set user", then press the [Enter] key. The domain name and user name are displayed. The login user name is shown following USERNAME =. - The user name is required to specify a destination. Write down the user name so that you do not forget it. 7-8
-
 1
1 -
2
-
3
-
4
-
5
-
6
-
7
-
8
-
9
-
10
-
11
-
12
-
13
-
14
-
15
-
16
-
17
-
18
-
19
-
20
-
21
-
22
-
23
-
24
-
25
-
26
-
27
-
28
-
29
-
30
-
31
-
32
-
33
-
34
-
35
-
36
-
37
-
38
-
39
-
40
-
41
-
42
-
43
-
44
-
45
-
46
-
47
-
48
-
49
-
50
-
51
-
52
-
53
-
54
-
55
-
56
-
57
-
58
-
59
-
60
-
61
-
62
-
63
-
64
-
65
-
66
-
67
-
68
-
69
-
70
-
71
-
72
-
73
-
74
-
75
-
76
-
77
-
78
-
79
-
80
-
81
-
82
-
83
-
84
-
85
-
86
-
87
-
88
-
89
-
90
-
91
-
92
-
93
-
94
-
95
-
96
-
97
-
98
-
 99
99 -
 100
100 -
 101
101 -
 102
102 -
 103
103 -
 104
104 -
 105
105 -
 106
106 -
 107
107 -
 108
108 -
 109
109 -
110
-
111
-
112
-
113
-
114
-
115
-
116
-
117
-
118
-
119
-
120
-
121
-
122
-
123
-
124
-
125
-
126
-
127
-
128
-
129
-
130
-
131
-
132
-
133
-
134
-
135
-
136
-
137
-
138
-
139
 |
 |
