Konica Minolta bizhub PRESS C1070/C1070P bizhub PRESS C1070/C1070P/C1060/bizhu - Page 64
Executing calibration, Color Density Control, Auto setting of Color Density Control
 |
View all Konica Minolta bizhub PRESS C1070/C1070P manuals
Add to My Manuals
Save this manual to your list of manuals |
Page 64 highlights
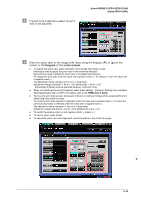
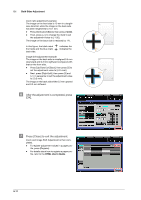
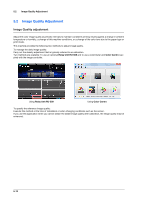
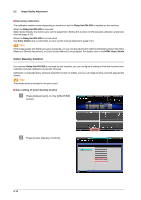
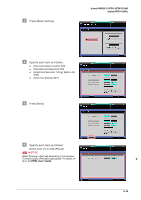
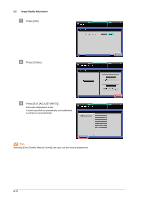
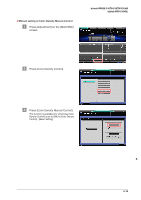
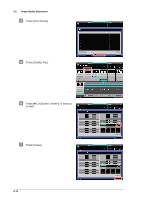
5.2 Image Quality Adjustment )Executing calibration The calibration method varies depending on whether or not the Relay Unit RU-509 is installed on the machine. When the Relay Unit RU-509 is mounted: Select [Color Density Control] to carry out the adjustment. Setting this function to ON executes calibration at periodic intervals (page 5-15). When the Relay Unit RU-509 is not mounted: Use Color Centro and a colorimeter to carry out the manual adjustment (page 5-21). Tips Tips If the image quality with higher accuracy is required, you can use the adjustment method with [Gamma Automatic Adj.], [Maximum Density Adjustment], or [Color Density Manual Control] added. For details, refer to the HTML User's Guide. Color Density Control If an optional Relay Unit RU-509 is mounted on this machine, you can configure a setting so that this machine automatically executes calibration at periodic intervals. Calibration is executed every arbitrarily specified number of sheets, and you can keep printing using the appropriate density. Tips Tips The printed chart is included in the print count. )Auto setting of Color Density Control " Press [Adjustment] on the [MACHINE] screen. # Press [Color Density Control]. 5-15
-
 1
1 -
2
-
3
-
4
-
5
-
6
-
7
-
8
-
9
-
10
-
11
-
12
-
13
-
14
-
15
-
16
-
17
-
18
-
19
-
20
-
21
-
22
-
23
-
24
-
25
-
26
-
27
-
28
-
29
-
30
-
31
-
32
-
33
-
34
-
35
-
36
-
37
-
38
-
39
-
40
-
41
-
42
-
43
-
44
-
45
-
46
-
47
-
48
-
49
-
50
-
51
-
52
-
53
-
54
-
55
-
56
-
57
-
58
-
 59
59 -
 60
60 -
 61
61 -
 62
62 -
 63
63 -
 64
64 -
 65
65 -
 66
66 -
 67
67 -
 68
68 -
 69
69 -
70
-
71
-
72
-
73
-
74
-
75
-
76
-
77
-
78
-
79
-
80
-
81
-
82
-
83
-
84
-
85
-
86
-
87
-
88
-
89
-
90
-
91
-
92
-
93
-
94
-
95
-
96
-
97
-
98
-
99
-
100
-
101
-
102
-
103
-
104
-
105
-
106
-
107
-
108
-
109
-
110
-
111
-
112
-
113
-
114
-
115
-
116
-
117
-
118
-
119
-
120
-
121
-
122
-
123
-
124
-
125
-
126
-
127
-
128
-
129
-
130
-
131
-
132
-
133
-
134
-
135
-
136
-
137
-
138
-
139
 |
 |