Konica Minolta bizhub PRESS C1070/C1070P bizhub PRESS C1070/C1070P/C1060/bizhu - Page 39
Loading paper into the Paper Feeder Unit PF-602m, guide lock knobs, side guide lock release lever
 |
View all Konica Minolta bizhub PRESS C1070/C1070P manuals
Add to My Manuals
Save this manual to your list of manuals |
Page 39 highlights
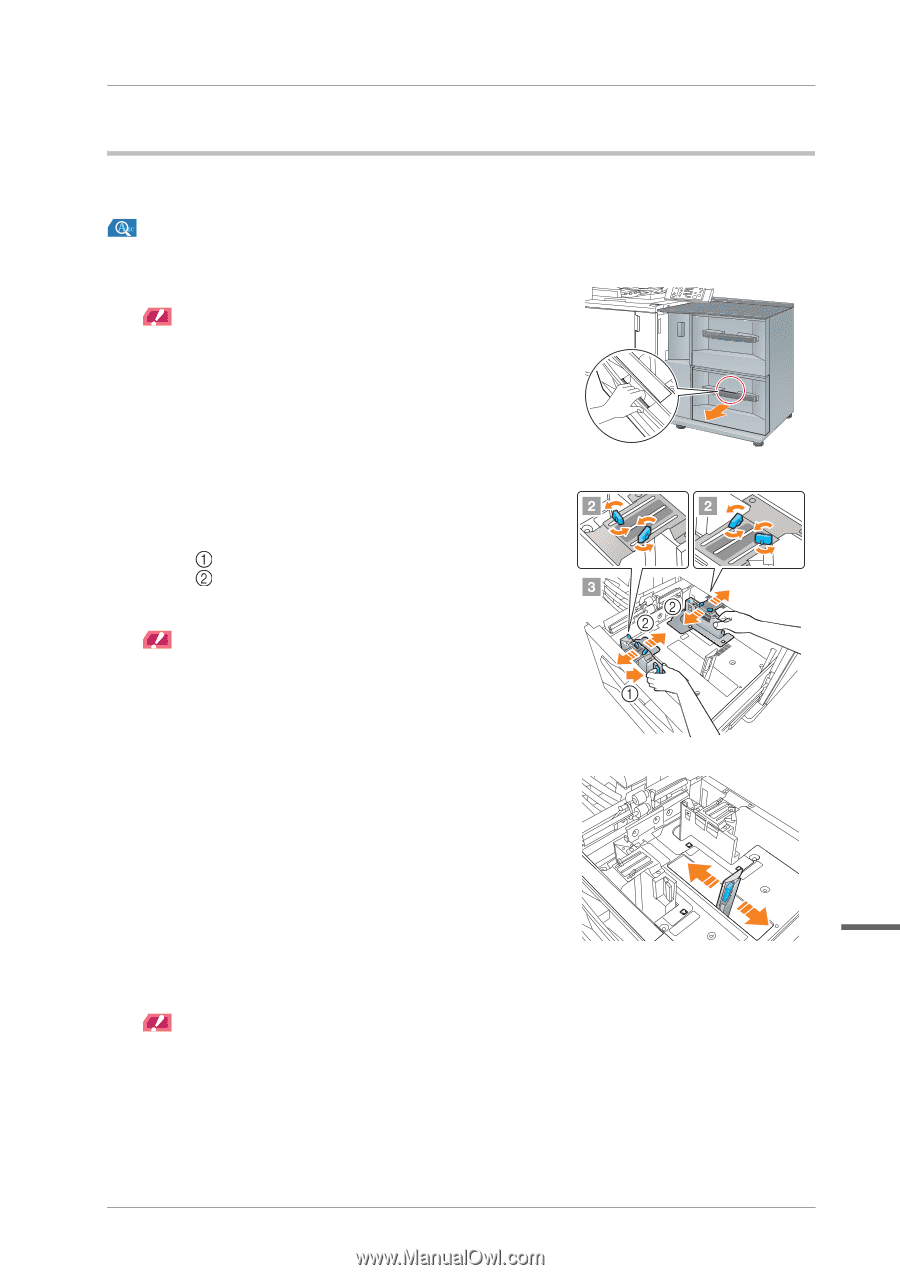
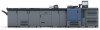
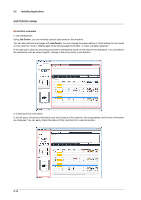
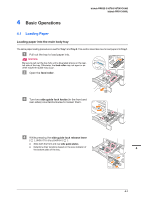
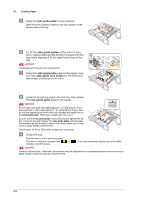
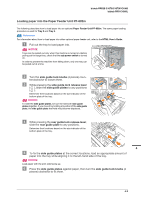
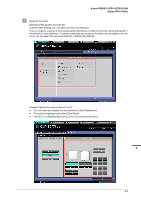
bizhub PRESS C1070/C1070P/C1060 bizhub PRO C1060L Loading paper into the Paper Feeder Unit PF-602m The following describes how to load paper into an optional Paper Feeder Unit PF-602m. The same paper loading procedure is used for Tray 3 and Tray 4. Reference For information about how to load paper into other optional paper feeder unit, refer to the HTML User's Guide. " Pull out the tray to load paper into. NOTICE Trays can be pulled out only when this machine is turned on. Before pulling out the target tray, check that the sub power switch is turned on. In order to prevent the machine from falling down, only one tray can be pulled out at a time. # Turn the side guide lock knobs (4 pieces) coun- terclockwise to loosen them. $ While pressing the side guide lock release lever ( ), slide the side guide plates to any positions ( ). Determine their locations based on the size indicator of the bottom plate of the tray. NOTICE To slide the side guide plates, be sure to hold both side guide plates together. If you move it by holding only either of the side guide plate, the side guide plate that held may become displaced. % While pressing the rear guide lock release lever, slide the rear guide plate to any positions. Determine their locations based on the size indicator of the bottom plate of the tray. 4 & To fix the side guide plates at the correct locations, load an appropriate amount of paper into the tray while aligning it to the left-hand side of the tray. NOTICE Load paper with the print side facing up. ' Press the side guide plates against paper, then turn the side guide lock knobs (4 pieces) clockwise to fix them. 4-3
-
 1
1 -
2
-
3
-
4
-
5
-
6
-
7
-
8
-
9
-
10
-
11
-
12
-
13
-
14
-
15
-
16
-
17
-
18
-
19
-
20
-
21
-
22
-
23
-
24
-
25
-
26
-
27
-
28
-
29
-
30
-
31
-
32
-
33
-
 34
34 -
 35
35 -
 36
36 -
 37
37 -
 38
38 -
 39
39 -
 40
40 -
 41
41 -
 42
42 -
 43
43 -
 44
44 -
45
-
46
-
47
-
48
-
49
-
50
-
51
-
52
-
53
-
54
-
55
-
56
-
57
-
58
-
59
-
60
-
61
-
62
-
63
-
64
-
65
-
66
-
67
-
68
-
69
-
70
-
71
-
72
-
73
-
74
-
75
-
76
-
77
-
78
-
79
-
80
-
81
-
82
-
83
-
84
-
85
-
86
-
87
-
88
-
89
-
90
-
91
-
92
-
93
-
94
-
95
-
96
-
97
-
98
-
99
-
100
-
101
-
102
-
103
-
104
-
105
-
106
-
107
-
108
-
109
-
110
-
111
-
112
-
113
-
114
-
115
-
116
-
117
-
118
-
119
-
120
-
121
-
122
-
123
-
124
-
125
-
126
-
127
-
128
-
129
-
130
-
131
-
132
-
133
-
134
-
135
-
136
-
137
-
138
-
139
 |
 |