Kyocera TASKalfa 620 Scan System (H) Operation Guide Rev-1 (Functions Edition) - Page 12
Setting Image Quality
 |
View all Kyocera TASKalfa 620 manuals
Add to My Manuals
Save this manual to your list of manuals |
Page 12 highlights
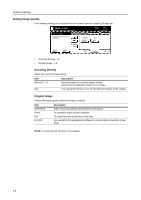
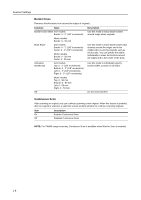
Scanner Settings Setting Image Quality The following settings are available from the scanner function screen's [Quality] tab. Ready to scan. Place the original and select destinatio.n Scan to PC-Sending Original Send 11×8½" 8½×11" 10/10/'08 10:10 Cont. TX to Cancel Destination Density4 Scanning Density Text Original Image Delete SUasever PaCt ABododkress Basic Quality Edit • Scanning Density...1-6 • Original Image...1-6 Scanning Density Adjust the scanned image density. Item Manual (1 - 7) Auto Description Manually adjust the scanned image density. Density can be adjusted in either 7 or 13 steps. The appropriate density is set by detecting the density of the original. Original Image Choose the image quality suited to the type of original. Item Text+Photo Photo Text for OCR Description When scanning originals with mixed text and photos. To reproduce depth of photo originals. To clearly reproduce penciled or fine lines. For use with OCR applications (software to convert optical characters to text data). NOTE: For Send E-mail, [Photo] is not available. 1-6
-
 1
1 -
2
-
3
-
4
-
5
-
6
-
 7
7 -
 8
8 -
 9
9 -
 10
10 -
 11
11 -
 12
12 -
 13
13 -
 14
14 -
 15
15 -
 16
16 -
 17
17 -
18
-
19
-
20
-
21
-
22
-
23
-
24
-
25
-
26
-
27
-
28
-
29
-
30
-
31
-
32
-
33
-
34
-
35
-
36
-
37
-
38
-
39
-
40
-
41
-
42
-
43
-
44
-
45
-
46
-
47
-
48
-
49
-
50
-
51
-
52
-
53
-
54
-
55
-
56
-
57
-
58
-
59
-
60
-
61
-
62
-
63
-
64
-
65
-
66
-
67
-
68
-
69
-
70
-
71
-
72
-
73
-
74
-
75
-
76
-
77
-
78
-
79
-
80
-
81
-
82
-
83
-
84
-
85
-
86
-
87
-
88
-
89
-
90
-
91
-
92
-
93
-
94
-
95
-
96
-
97
-
98
-
99
-
100
-
101
-
102
-
103
-
104
-
105
-
106
-
107
-
108
-
109
-
110
-
111
-
112
-
113
-
114
-
115
-
116
-
117
-
118
-
119
-
120
-
121
-
122
-
123
-
124
 |
 |
