Kyocera TASKalfa 620 Scan System (H) Operation Guide Rev-1 (Functions Edition) - Page 21
Continuous Sending, File Name Entry, Permit File Overwrite, Description - scanner file utility
 |
View all Kyocera TASKalfa 620 manuals
Add to My Manuals
Save this manual to your list of manuals |
Page 21 highlights
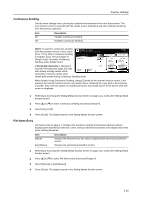
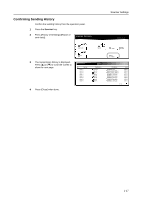
Scanner Settings Continuous Sending Use the same settings from a previously completed transmission for the next transmission. The scan function screen is returned with the sender (user), destination and other settings remaining from the previous operation. Item On Off Description Enables Continuous Sending. Disables Continuous Sending. NOTE: To switch to continuous sending from the scanner function screen, press [Cont. TX to]. When continuous sending is enabled, [Cont. TX to] changes to [Single Scan]. To disable Continuous Sending, press [Single Scan]. Ready to scan. Place the original and select destinatio.n Scan to PC-Sending Destination If Permit File Overwrite is checked in Delete Scanner File Utility (see page 3-8), files with already existing names will be Save at User PC Address Book overwritten. Exercise caution when inputting file names during Continuous Sending mode. Register Prgrm Auto Select Orig.Size Auto size Select Send Size Basic Original 11×8½" 08/0 Cont. TX to Top Edge Orig. Set Direction 200dpi Scanning Resolution Quality When finished using Continuous Sending, always [Cancel] on the scanner function screen. If not pressed, the scanner function screen may remain active, rendering the copy, print or fax functions unusable. Also, exercise caution as unauthorized users may obtain access to the device while this screen is displayed. 1 Referring to Accessing the Setting default function Screen on page 1-11, access the Setting default function screen. 2 Press [] or [] to select Continuous Sending and press [Change #]. 3 Select [On] or [Off]. 4 Press [Close]. The display returns to the Setting default function screen. File Name Entry File Name Entry on page 1-5 configure the machine to display the filename input box without displaying the auto/manual selection screen. Doing so allows this operation to be skipped each time when entering filenames. Item Manual Auto/Manual Description Displays the filename entry box without displaying the auto/manual selection screen. Displays the auto/manual selection screen. 1 Referring to Accessing the Setting default function Screen on page 1-11, access the Setting default function screen. 2 Press [] or [] to select File Name entry and press [Change #]. 3 Select [Manual] or [Auto/Manual]. 4 Press [Close]. The display returns to the Setting default function screen. 1-15
-
 1
1 -
2
-
3
-
4
-
5
-
6
-
7
-
8
-
9
-
10
-
11
-
12
-
13
-
14
-
15
-
 16
16 -
 17
17 -
 18
18 -
 19
19 -
 20
20 -
 21
21 -
 22
22 -
 23
23 -
 24
24 -
 25
25 -
 26
26 -
27
-
28
-
29
-
30
-
31
-
32
-
33
-
34
-
35
-
36
-
37
-
38
-
39
-
40
-
41
-
42
-
43
-
44
-
45
-
46
-
47
-
48
-
49
-
50
-
51
-
52
-
53
-
54
-
55
-
56
-
57
-
58
-
59
-
60
-
61
-
62
-
63
-
64
-
65
-
66
-
67
-
68
-
69
-
70
-
71
-
72
-
73
-
74
-
75
-
76
-
77
-
78
-
79
-
80
-
81
-
82
-
83
-
84
-
85
-
86
-
87
-
88
-
89
-
90
-
91
-
92
-
93
-
94
-
95
-
96
-
97
-
98
-
99
-
100
-
101
-
102
-
103
-
104
-
105
-
106
-
107
-
108
-
109
-
110
-
111
-
112
-
113
-
114
-
115
-
116
-
117
-
118
-
119
-
120
-
121
-
122
-
123
-
124
 |
 |
