Kyocera TASKalfa 620 Scan System (H) Operation Guide Rev-1 (Functions Edition) - Page 65
Launching Address Editor, Edit Data Selection Screen, Connect Scanner Address Setting
 |
View all Kyocera TASKalfa 620 manuals
Add to My Manuals
Save this manual to your list of manuals |
Page 65 highlights
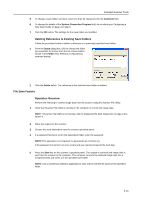
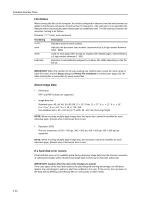
2 Place a check in the check box of Kyocera Address Editor to be deleted and click on Uninstall. Included Scanner Tools 3 Follow the wizard to complete the installation. Kyocera Address Editor i s deleted. Launching Address Editor 1 Launch Address Editor NOTE: Click the Windows start button, and on the menu that appears select All Programs Scanner User SoftwareAddress Editor to launch Address Editor. 2 The Address Editor main menu is displayed. 1 2 3 4 No. Item 1 Menu Bar 2 Toolbar 3 Menu Area 4 Work Area Description Use toolbar or menu area buttons selecting from the menu bar. A row of buttons is provided for easy access to write edited data to the scanner or other operations. Select desired items to configure such as scanner or e-mail settings. Display each setting window here for configuration. Edit Data Selection Screen Select the Address Editor data to edit. The available edit methods are connect to the scanner and directly edit scanner settings or create or edit settings data without connecting to the scanner. Data created or edited without connecting to the scanner is sent to the scanner after editing is complete. NOTE: When Address Editor is launched, Connect (Scanner Address Setting) is selected. 3-15
-
 1
1 -
2
-
3
-
4
-
5
-
6
-
7
-
8
-
9
-
10
-
11
-
12
-
13
-
14
-
15
-
16
-
17
-
18
-
19
-
20
-
21
-
22
-
23
-
24
-
25
-
26
-
27
-
28
-
29
-
30
-
31
-
32
-
33
-
34
-
35
-
36
-
37
-
38
-
39
-
40
-
41
-
42
-
43
-
44
-
45
-
46
-
47
-
48
-
49
-
50
-
51
-
52
-
53
-
54
-
55
-
56
-
57
-
58
-
59
-
 60
60 -
 61
61 -
 62
62 -
 63
63 -
 64
64 -
 65
65 -
 66
66 -
 67
67 -
 68
68 -
 69
69 -
 70
70 -
71
-
72
-
73
-
74
-
75
-
76
-
77
-
78
-
79
-
80
-
81
-
82
-
83
-
84
-
85
-
86
-
87
-
88
-
89
-
90
-
91
-
92
-
93
-
94
-
95
-
96
-
97
-
98
-
99
-
100
-
101
-
102
-
103
-
104
-
105
-
106
-
107
-
108
-
109
-
110
-
111
-
112
-
113
-
114
-
115
-
116
-
117
-
118
-
119
-
120
-
121
-
122
-
123
-
124
 |
 |
