Kyocera TASKalfa 620 Scan System (H) Operation Guide Rev-1 (Functions Edition) - Page 73
Sender UserList, registered, a * is shown in this field. When editing, the destination list E-mail - network scanner manual
 |
View all Kyocera TASKalfa 620 manuals
Add to My Manuals
Save this manual to your list of manuals |
Page 73 highlights
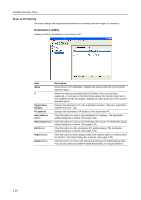
Included Scanner Tools Setting Item Continuous sending Value ON, OFF File name Input Manual, Auto/Manual Skip sender (user) ON, OFF select Description Use the same settings from a previously completed transmission for the next transmission. The scan function screen is returned with the sender (user), destination and other settings remaining from the previous operation. Displays the filename input box without displaying the auto/manual selection screen. When using this scanner, a sender (user) must be first selected. Set to ON to force the sender (user) to User No. 001 and skip sender (user) selection. Sender (User)List Configure the Sender (User) List for use with network scanner functions ( Send E-mail, Scan to PC). Item Name E P Registration Number E-mail Address New address Button Description As the sender, displays the name displayed at the top of the scanner operation panel. When the address associated with the destination list (E-mail) has been registered, a * is shown in this field. When editing, the destination list (E-mail) is also modified. When the address associated with the destination list (PC) has been registered, a * is shown in this field. When editing, the destination list (PC) is also modified. Displays the sender data registration numbers. The registration numbers are shown as a list on the scanner operation panel. Up to 40 items may be registered. Shows the sender e-mail address. Click this button to create a new sender data. The sender editing dialog box is shown. (See page 3-24) 3-23
-
 1
1 -
2
-
3
-
4
-
5
-
6
-
7
-
8
-
9
-
10
-
11
-
12
-
13
-
14
-
15
-
16
-
17
-
18
-
19
-
20
-
21
-
22
-
23
-
24
-
25
-
26
-
27
-
28
-
29
-
30
-
31
-
32
-
33
-
34
-
35
-
36
-
37
-
38
-
39
-
40
-
41
-
42
-
43
-
44
-
45
-
46
-
47
-
48
-
49
-
50
-
51
-
52
-
53
-
54
-
55
-
56
-
57
-
58
-
59
-
60
-
61
-
62
-
63
-
64
-
65
-
66
-
67
-
 68
68 -
 69
69 -
 70
70 -
 71
71 -
 72
72 -
 73
73 -
 74
74 -
 75
75 -
 76
76 -
 77
77 -
 78
78 -
79
-
80
-
81
-
82
-
83
-
84
-
85
-
86
-
87
-
88
-
89
-
90
-
91
-
92
-
93
-
94
-
95
-
96
-
97
-
98
-
99
-
100
-
101
-
102
-
103
-
104
-
105
-
106
-
107
-
108
-
109
-
110
-
111
-
112
-
113
-
114
-
115
-
116
-
117
-
118
-
119
-
120
-
121
-
122
-
123
-
124
 |
 |
