Lenovo ThinkPad X220i (English) User Guide - Page 215
Network Boot sequence, Flash update, Network Boot, To define a sequence, Startup, Security
 |
View all Lenovo ThinkPad X220i manuals
Add to My Manuals
Save this manual to your list of manuals |
Page 215 highlights
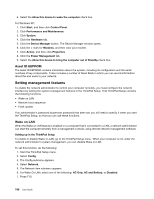
Network Boot sequence When your computer is turned on remotely, system will try to boot from the device that is selected by Network Boot setting, and then follow the boot order list in the Boot menu. To define a sequence: 1. On the ThinkPad Setup menu, select Startup. The Startup submenu appears. 2. Select Network Boot and press Enter key to show pop-up boot device list. 3. Select a boot device from the list to make it as top boot priority. 4. Press F10. Note: If you want to initialize the setting to return to the default startup sequence, press F9. The default settings are automatically reloaded. Flash update When a Flash UEFI BIOS update from the network is enabled, a network administrator can remotely update the system programs in your computer from a management console. The following requirements must be met: • Update Flash from network must also be enabled; the procedure is given below. • Your computer must be started over the LAN. • Your computer must be engaged in a Preboot eXecution Environment. • Network-management software must be installed in the remote administrator's computer. To enable or disable the Flash update from the network setting, do the following: 1. On the ThinkPad Setup menu, select Security. The Security submenu appears. 2. Select UEFI BIOS Update Option. The UEFI BIOS Update Option submenu appears. 3. For Flash Over LAN, select either Enabled or Disabled. 4. Press F10. Chapter 8. Advanced configuration 199
-
 1
1 -
2
-
3
-
4
-
5
-
6
-
7
-
8
-
9
-
10
-
11
-
12
-
13
-
14
-
15
-
16
-
17
-
18
-
19
-
20
-
21
-
22
-
23
-
24
-
25
-
26
-
27
-
28
-
29
-
30
-
31
-
32
-
33
-
34
-
35
-
36
-
37
-
38
-
39
-
40
-
41
-
42
-
43
-
44
-
45
-
46
-
47
-
48
-
49
-
50
-
51
-
52
-
53
-
54
-
55
-
56
-
57
-
58
-
59
-
60
-
61
-
62
-
63
-
64
-
65
-
66
-
67
-
68
-
69
-
70
-
71
-
72
-
73
-
74
-
75
-
76
-
77
-
78
-
79
-
80
-
81
-
82
-
83
-
84
-
85
-
86
-
87
-
88
-
89
-
90
-
91
-
92
-
93
-
94
-
95
-
96
-
97
-
98
-
99
-
100
-
101
-
102
-
103
-
104
-
105
-
106
-
107
-
108
-
109
-
110
-
111
-
112
-
113
-
114
-
115
-
116
-
117
-
118
-
119
-
120
-
121
-
122
-
123
-
124
-
125
-
126
-
127
-
128
-
129
-
130
-
131
-
132
-
133
-
134
-
135
-
136
-
137
-
138
-
139
-
140
-
141
-
142
-
143
-
144
-
145
-
146
-
147
-
148
-
149
-
150
-
151
-
152
-
153
-
154
-
155
-
156
-
157
-
158
-
159
-
160
-
161
-
162
-
163
-
164
-
165
-
166
-
167
-
168
-
169
-
170
-
171
-
172
-
173
-
174
-
175
-
176
-
177
-
178
-
179
-
180
-
181
-
182
-
183
-
184
-
185
-
186
-
187
-
188
-
189
-
190
-
191
-
192
-
193
-
194
-
195
-
196
-
197
-
198
-
199
-
200
-
201
-
202
-
203
-
204
-
205
-
206
-
207
-
208
-
209
-
 210
210 -
 211
211 -
 212
212 -
 213
213 -
 214
214 -
 215
215 -
 216
216 -
 217
217 -
 218
218 -
 219
219 -
 220
220 -
221
-
222
-
223
-
224
-
225
-
226
-
227
-
228
-
229
-
230
-
231
-
232
-
233
-
234
-
235
-
236
-
237
-
238
-
239
-
240
-
241
-
242
-
243
-
244
-
245
-
246
-
247
-
248
-
249
-
250
-
251
-
252
-
253
-
254
-
255
-
256
-
257
-
258
-
259
-
260
-
261
-
262
-
263
-
264
-
265
-
266
-
267
-
268
-
269
-
270
 |
 |
