Lexmark WinWriter 150c Service Manual - Page 47
Paper Feed Motor Removal, Paper Guide and EOF Flag Assembly Removal, Remove the system board.
 |
View all Lexmark WinWriter 150c manuals
Add to My Manuals
Save this manual to your list of manuals |
Page 47 highlights
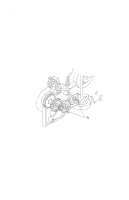
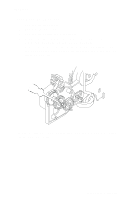
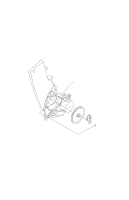
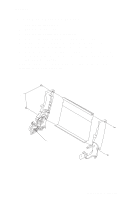
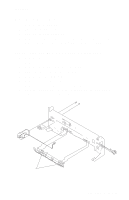
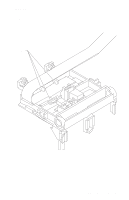
4077-001 Paper Feed Motor Removal 1. Remove the front cover. 2. Remove the rear cover. 3. Remove the base assembly. 4. Remove the two screws securing the paper feed motor and remove the motor. Note the routing of the motor cable. Paper Guide and EOF Flag Assembly Removal 1. Remove the front cover. 2. Remove the rear cover. 3. Remove the printhead carrier assembly. 4. Remove the carrier frame assembly. 5. Remove the system board. 6. Remove the encoder strip. 7. Remove the three small feed roll springs. 8. Push the locking tabs [A] to the rear and pull the paper guide down and out of the carrier frame. A Repair Information 38
-
 1
1 -
2
-
3
-
4
-
5
-
6
-
7
-
8
-
9
-
10
-
11
-
12
-
13
-
14
-
15
-
16
-
17
-
18
-
19
-
20
-
21
-
22
-
23
-
24
-
25
-
26
-
27
-
28
-
29
-
30
-
31
-
32
-
33
-
34
-
35
-
36
-
37
-
38
-
39
-
40
-
41
-
 42
42 -
 43
43 -
 44
44 -
 45
45 -
 46
46 -
 47
47 -
 48
48 -
 49
49 -
 50
50 -
 51
51 -
 52
52 -
53
-
54
-
55
-
56
-
57
-
58
-
59
-
60
-
61
-
62
-
63
-
64
-
65
-
66
-
67
-
68
-
69
-
70
-
71
-
72
-
73
-
74
-
75
-
76
-
77
-
78
-
79
-
80
 |
 |

4077-001
Repair Information
38
Paper Feed Motor Removal
1.
Remove the front cover.
2.
Remove the rear cover.
3.
Remove the base assembly.
4.
Remove the two screws securing the paper feed motor and
remove the motor. Note the routing of the motor cable.
Paper Guide and EOF Flag Assembly Removal
1.
Remove the front cover.
2.
Remove the rear cover.
3.
Remove the printhead carrier assembly.
4.
Remove the carrier frame assembly.
5.
Remove the system board.
6.
Remove the encoder strip.
7.
Remove the three small feed roll springs.
8.
Push the locking tabs [A] to the rear and pull the paper guide
down and out of the carrier frame.
A