Lexmark WinWriter 150c Service Manual - Page 52
Printhead Carrier Assembly Removal, Some machines may have a retainer spring in place of
 |
View all Lexmark WinWriter 150c manuals
Add to My Manuals
Save this manual to your list of manuals |
Page 52 highlights
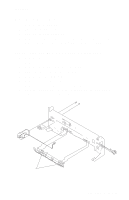
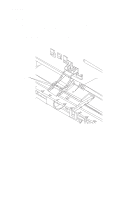
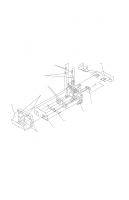
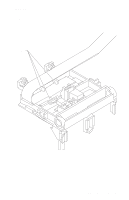
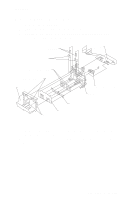
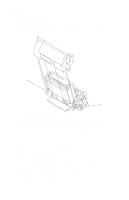
4077-001 Printhead Carrier Assembly Removal 1. Remove the front cover. 2. Unlock the four printhead cable connectors and disconnect the printhead cable from the system board. 3. Remove the retainer from the right end of the carrier guide rod. Note: Some machines may have a retainer spring in place of the E-ring at the left end of the carrier rod. 4. Slide the carrier guide rod to the left, out of the machine. 5. Lift the carrier out of the machine. 43
-
 1
1 -
2
-
3
-
4
-
5
-
6
-
7
-
8
-
9
-
10
-
11
-
12
-
13
-
14
-
15
-
16
-
17
-
18
-
19
-
20
-
21
-
22
-
23
-
24
-
25
-
26
-
27
-
28
-
29
-
30
-
31
-
32
-
33
-
34
-
35
-
36
-
37
-
38
-
39
-
40
-
41
-
42
-
43
-
44
-
45
-
46
-
 47
47 -
 48
48 -
 49
49 -
 50
50 -
 51
51 -
 52
52 -
 53
53 -
 54
54 -
 55
55 -
 56
56 -
 57
57 -
58
-
59
-
60
-
61
-
62
-
63
-
64
-
65
-
66
-
67
-
68
-
69
-
70
-
71
-
72
-
73
-
74
-
75
-
76
-
77
-
78
-
79
-
80
 |
 |

4077-001
43
Printhead Carrier Assembly Removal
1.
Remove the front cover.
2.
Unlock the four printhead cable connectors and disconnect the
printhead cable from the system board.
3.
Remove the retainer from the right end of the carrier guide rod.
Note:
Some machines may have a retainer spring in place of the
E-ring at the left end of the carrier rod.
4.
Slide the carrier guide rod to the left, out of the machine.
5.
Lift the carrier out of the machine.