Linksys WIP300 User Guide - Page 42
Secure Setup, Settings, Language, Soft Key run SecureEasySetup.
 |
UPC - 745883569335
View all Linksys WIP300 manuals
Add to My Manuals
Save this manual to your list of manuals |
Page 42 highlights
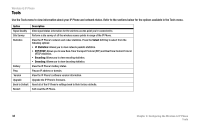
Secure Setup Wireless-G IP Phone The Secure Setup menu allows you to configure your IP Phone's wireless network settings with the push of a button. If you have a Linksys wireless router or access point that supports SecureEasySetup, you can use the Secure Setup feature to quickly and easily configure your IP Phone's wireless network settings. Before you begin, locate the SecureEasySetup or Cisco logo button on the wireless router or access point, then proceed to step 1. If you need help finding the button on your wireless router or access point, refer to the on-screen User Guide included with the wireless router or access point. 1. Press the SecureEasySetup or Cisco logo button on the wireless router or access point. 2. When the SecureEasySetup or Cisco logo begins to flash, press the Select Soft Key, then press the Yes Soft Key run SecureEasySetup. Note: You can also press and hold the Clear button to quickly access the Secure Setup feature from the IP Phone's home screen. When you see the Run SES message appear on the screen, press the Yes Soft Key. 3. When you see the Save Configuration message appear on the screen, press the Save Soft Key. 4. Select the Profile you would like to save the new wireless configuration settings to, then press the Save Soft Key. Settings Use the Settings menu to make changes to select regional settings, set the date and time, and personalize your phone. Refer to the sections below for the options available in the Settings menu. Language The Language menu allows you set the IP Phone's display language. To change the language, highlight the language you would like the phone to use, then press the Navigation button to save your setting. Chapter 4: Configuring the Wireless-G IP Phone 33 Secure Setup
-
 1
1 -
2
-
3
-
4
-
5
-
6
-
7
-
8
-
9
-
10
-
11
-
12
-
13
-
14
-
15
-
16
-
17
-
18
-
19
-
20
-
21
-
22
-
23
-
24
-
25
-
26
-
27
-
28
-
29
-
30
-
31
-
32
-
33
-
34
-
35
-
36
-
 37
37 -
 38
38 -
 39
39 -
 40
40 -
 41
41 -
 42
42 -
 43
43 -
 44
44 -
 45
45 -
 46
46 -
 47
47 -
48
-
49
-
50
-
51
-
52
-
53
-
54
-
55
-
56
-
57
-
58
-
59
-
60
-
61
-
62
-
63
-
64
-
65
-
66
-
67
-
68
-
69
-
70
-
71
-
72
-
73
-
74
-
75
-
76
-
77
-
78
-
79
-
80
-
81
-
82
-
83
-
84
-
85
-
86
-
87
-
88
-
89
-
90
 |
 |