Linksys WIP300 User Guide - Page 48
Using the Web-based Utility, Overview, How to Access the Web-based Utility - wifi phone
 |
UPC - 745883569335
View all Linksys WIP300 manuals
Add to My Manuals
Save this manual to your list of manuals |
Page 48 highlights
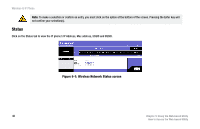
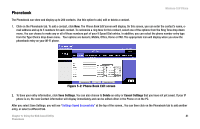
Chapter 5: Using the Web-based Utility Wireless-G IP Phone Overview For your convenience, you can use the Web-based utility on your PC to view, change or edit the most commonly used features of your IP Phone. Note: Your phone must be set to its home screen to use the Web-based utility. You can make choices from either the phone or the PC, but not both at the same time. If your phone is not on the home screen, the message: Phone Cfg file locked by: xxxxxx will display on the PC when you select an option. How to Access the Web-based Utility 1. To start, you will need the IP phone's IP address. From the phone's home screen press the Status soft key. The next screen will display the Phone Status. Item 2 is the IP address. Note the address. If you use a Static IP, the address will stay the same. If you use a DHCP, the IP address may change every time you turn on the phone. 2. On a computer that is connected to the same network as the phone, launch any Internet browser. In the Address field, enter http://IP address where the IP address is the WiFi Phone's IP address that you obtained in step 1. Press Enter. 3. You will see the Wi-Fi Phone login screen. Enter the IP Phone's Username and Password. Click Submit. You will log in to the Status screen and can select any of the tabs to add or change phone setting information. The default User Name is admin and the Admin password is "admin", but may change if you have an ITSP. Chapter 5: Using the Web-based Utility 39 Overview
-
 1
1 -
2
-
3
-
4
-
5
-
6
-
7
-
8
-
9
-
10
-
11
-
12
-
13
-
14
-
15
-
16
-
17
-
18
-
19
-
20
-
21
-
22
-
23
-
24
-
25
-
26
-
27
-
28
-
29
-
30
-
31
-
32
-
33
-
34
-
35
-
36
-
37
-
38
-
39
-
40
-
41
-
42
-
 43
43 -
 44
44 -
 45
45 -
 46
46 -
 47
47 -
 48
48 -
 49
49 -
 50
50 -
 51
51 -
 52
52 -
 53
53 -
54
-
55
-
56
-
57
-
58
-
59
-
60
-
61
-
62
-
63
-
64
-
65
-
66
-
67
-
68
-
69
-
70
-
71
-
72
-
73
-
74
-
75
-
76
-
77
-
78
-
79
-
80
-
81
-
82
-
83
-
84
-
85
-
86
-
87
-
88
-
89
-
90
 |
 |
