Linksys WIP300 User Guide - Page 63
admin, Applications & Gaming, Port Range Forwarding, User Name, Password, Application
 |
UPC - 745883569335
View all Linksys WIP300 manuals
Add to My Manuals
Save this manual to your list of manuals |
Page 63 highlights
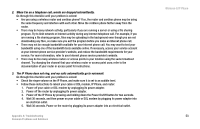
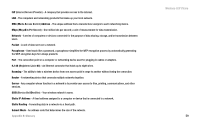
Wireless-G IP Phone 6. Wait 10 seconds. Power on the IP Phone by pressing and holding down the Power On/Off button for two seconds. 7. Reboot one of your networked computers, and check for an active Internet connection. • Set up port forwarding on your router. You must specify that four port ranges be forwarded to the IP address of the IP Phone. These four port ranges are as follows: 5060-5061 (UDP), 53-53 (UDP), 69-69 (UDP), and 10000-20000 (UDP). Note: By default, the IP Phone uses a dynamic IP address assigned by your router. For port forwarding, you may need to assign a static IP address to the IP Phone. Contact your Internet phone service provider for assistance. If you have a non-Linksys router, refer to its documentation for instructions. If you have a Linksys router, then follow these instructions: 1. On one of your networked computers, open your web browser. 2. Access the Router's Web-based Utility by going to http://192.168.1.1 or the IP address of the Router. 3. A login screen will appear. Leave the User Name field blank. Enter the Router's password (the default is admin) in the Password field. Then click the OK button. 4. Click the Applications & Gaming tab, and then click the Port Range Forwarding tab. 5. For each port range you must specify, enter a different name in the Application field. Then enter the number or range of external port(s) used by the IP Phone. 6. Select the protocol you will be using, UDP. 7. Enter the IP address of the IP Phone. For example, if the IP Phone's IP address is 192.168.1.100, you would enter 100 in the field provided. 54 Appendix A: Troubleshooting Common Problems and Solutions
-
 1
1 -
2
-
3
-
4
-
5
-
6
-
7
-
8
-
9
-
10
-
11
-
12
-
13
-
14
-
15
-
16
-
17
-
18
-
19
-
20
-
21
-
22
-
23
-
24
-
25
-
26
-
27
-
28
-
29
-
30
-
31
-
32
-
33
-
34
-
35
-
36
-
37
-
38
-
39
-
40
-
41
-
42
-
43
-
44
-
45
-
46
-
47
-
48
-
49
-
50
-
51
-
52
-
53
-
54
-
55
-
56
-
57
-
 58
58 -
 59
59 -
 60
60 -
 61
61 -
 62
62 -
 63
63 -
 64
64 -
 65
65 -
 66
66 -
 67
67 -
 68
68 -
69
-
70
-
71
-
72
-
73
-
74
-
75
-
76
-
77
-
78
-
79
-
80
-
81
-
82
-
83
-
84
-
85
-
86
-
87
-
88
-
89
-
90
 |
 |