Linksys WRT54GS-FR User's Manual - Page 24
Refresh, Close, Apply, Cancel, Manual, Disable, Enable, Incoming Access Log, System, Address - range
 |
UPC - 745883560028
View all Linksys WRT54GS-FR manuals
Add to My Manuals
Save this manual to your list of manuals |
Page 24 highlights
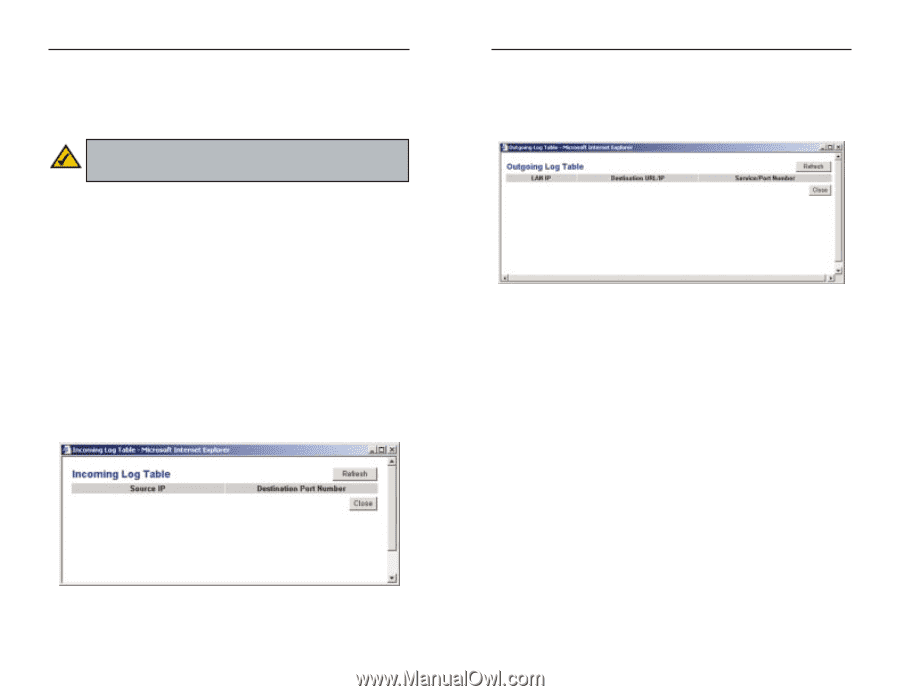
Instant Wireless® Series To remotely manage the Router, enter http://xxx.xxx.xxx.xxx:8080 (the x's represent the Router's Internet IP address, and 8080 represents the specified port) in your web browser's Address field. You will be asked for the Router's password. After successfully entering the password, you will be able to access the Router's web-based utility. Note: If the Remote Management feature is enabled, anyone who knows the Router's Internet IP address and password will be able to alter the Router's settings. MTU MTU is the Maximum Transmission Unit. It specifies the largest packet size permitted for Internet transmission. Keep the default setting, Auto, to have the Router select the best MTU for your Internet connection. To specify a MTU size, select Manual, and enter the value desired (default is 1400). You should leave this value in the 1200 to 1500 range. Log The Router can keep logs of all traffic for your Internet connection. To disable the Log function, keep the default setting, Disable. To monitor traffic between the network and the Internet, select Enable. Temporary logs can be accessed by clicking either the Incoming Access Log or Outgoing Access Log button. The Incoming Access Log gives you a log of all the incoming Internet traffic, displaying the Source IP address and Destination Port Number of the Router for each activity (see Figure 6-11). Click the Refresh button to update the logs. Click the Close button to return to the System screen. Wireless-G Broadband Router The Outgoing Access Log gives you a log of all outgoing Internet traffic. For each activity, it displays the LAN IP address, the Destination URL or IP address of the Internet site accessed, as well as the Service/Port Number used (see Figure 6-12). Click the Refresh button to update the logs. Click the Close button to return to the System screen. Figure 6-12 To save your changes on this page, click the Apply button. To cancel any unsaved changes on this page, click the Cancel button. To get more information about the features, click the Help button. Figure 6-11 40 41
-
 1
1 -
2
-
3
-
4
-
5
-
6
-
7
-
8
-
9
-
10
-
11
-
12
-
13
-
14
-
15
-
16
-
17
-
18
-
 19
19 -
 20
20 -
 21
21 -
 22
22 -
 23
23 -
 24
24 -
 25
25 -
 26
26 -
 27
27 -
 28
28 -
 29
29 -
30
-
31
-
32
-
33
-
34
-
35
-
36
-
37
-
38
-
39
-
40
-
41
-
42
-
43
-
44
-
45
-
46
-
47
-
48
-
49
-
50
-
51
-
52
-
53
-
54
-
55
-
56
-
57
-
58
-
59
-
60
-
61
 |
 |