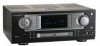
Motorola DCP501 User Guide - Page 56
Setting Up Audio, Input Setup
 |
UPC - 612572007839
View all Motorola DCP501 manuals
Add to My Manuals
Save this manual to your list of manuals |
Page 56 highlights
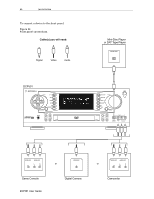
46 Operation Some notes about DCP501 operation: Lamp test When you turn on your DCP501, a lamp test is performed on the DCP501 display. This test causes all icons to turn on for ½ second and then MOTOROLA is displayed for 2 seconds. Turning on the DCP501 for the first time If this is the first time you have turned on your DCP501, S E T S P E A K E R S scrolls once across the DCP501 display. The same message is displayed when you have returned the DCP501 to the default speaker settings. Setup Timeout During any setup configuration, if no remote control or front panel button is pressed for 20-seconds, the DCP501 exits the setup mode. Headphones Connecting headphones to the DCP501 headphone socket mutes the DCP501 speaker outputs. Speakers Speakers rated at 8 ohms are preferred, but the DCP501 speaker outputs can drive speakers rated from 4 to 16 ohms. NOTE To turn on the DCP501, press the power button on the remote control or the front of the DCP501. When not in use, turn off the DCP501. Setting Up Audio This section includes information about setting up speakers and selecting audio inputs. Once a digital input is assigned to a particular source, the DCP501 always uses the assigned digital audio input instead of the analog audio input if both are present for the same source. You must select various input sources from the INPUT SETUP menu so the DCP501 knows which digital inputs are assigned. The DCP501 display shows the current audio input used by the selected source: O P T 1 , O P T 2 , C O A X , or A N A L O G . For digital audio inputs only, the DCP501 turns on an icon to distinguish the digital input type: P C M , d t s , or D D I G I T A L . Input Setup To change the audio inputs on the DCP501: 1 Press SETUP to display the M A I N S E T U P menu on your TV or A U D I O S E T on the DCP501 display. On-screen Display DCP501 Display * MA I N SET UP * XAUDI O SET UP D V D SET UP CAT V RE CORD CAT V C H A N N E L EXI T S C A N AUDI O S E T DCP501 User Guide
-
 1
1 -
2
-
3
-
4
-
5
-
6
-
7
-
8
-
9
-
10
-
11
-
12
-
13
-
14
-
15
-
16
-
17
-
18
-
19
-
20
-
21
-
22
-
23
-
24
-
25
-
26
-
27
-
28
-
29
-
30
-
31
-
32
-
33
-
34
-
35
-
36
-
37
-
38
-
39
-
40
-
41
-
42
-
43
-
44
-
45
-
46
-
47
-
48
-
49
-
50
-
 51
51 -
 52
52 -
 53
53 -
 54
54 -
 55
55 -
 56
56 -
 57
57 -
 58
58 -
 59
59 -
 60
60 -
 61
61 -
62
-
63
-
64
-
65
-
66
-
67
-
68
-
69
-
70
-
71
-
72
-
73
-
74
-
75
-
76
-
77
-
78
-
79
-
80
-
81
-
82
-
83
-
84
-
85
-
86
-
87
-
88
-
89
-
90
-
91
-
92
-
93
-
94
-
95
-
96
-
97
-
98
-
99
-
100
-
101
-
102
-
103
-
104
-
105
-
106
-
107
-
108
-
109
-
110
-
111
-
112
-
113
-
114
-
115
-
116
-
117
-
118
-
119
-
120
-
121
-
122
-
123
-
124
-
125
-
126
-
127
-
128
-
129
-
130
-
131
-
132
-
133
-
134
-
135
-
136
-
137
-
138
-
139
-
140
-
141
 |
 |
