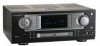
Motorola DCP501 User Guide - Page 58
To assign a different audio, input to the selected video input, press down arrow
 |
UPC - 612572007839
View all Motorola DCP501 manuals
Add to My Manuals
Save this manual to your list of manuals |
Page 58 highlights
48 Operation 5 Press CURSOR left/right (< >) to select V C R 1, V C R 2, or V I D E O 1. 6 Press SELECT or OK to accept your selection. Repeat for other video inputs as necessary. If assigned, the DCP501 always uses a digital audio input. You must select various input sources from the INPUT SETUP menu so the DCP501 knows which digital inputs are assigned. The DCP501 display shows the current audio input used by the selected source: O P T 1 , C O A X , or A N A L O G . For digital audio inputs only, the DCP501 turns on an icon to distinguish the digital input type, P C M , d t s , or D D I G I T A L . To assign a different audio input to the selected video input, press down arrow (∨). On-screen Display DCP501 Display * I NPUT SET UP * I NPUT : V I DE O1 X DI GI T AL I N: OPT I CAL 1 RET URN T O ME N U AUD I NPUT 7 Press SELECT or OK and the current audio input assigned to the video input flashes: (A N A L O G, C O A X, or O P T I C A L 1). In this example, O P T I C A L 1 flashes. On-screen Display DCP501 Display * I NPUT SET UP * I NPUT : V I DE O1 X DI GI T AL I N: OPT I CAL 1 RET URN T O ME N U OP T I CAL 1 8 Press CURSOR left/right (< >) to select A N A L O G, C O A X, or O P T I C A L 1. 9 Press SELECT or OK to accept your selection. Repeat for other video inputs as necessary. Press SETUP to exit the I N P U T S E T U P menu. DCP501 User Guide
-
 1
1 -
2
-
3
-
4
-
5
-
6
-
7
-
8
-
9
-
10
-
11
-
12
-
13
-
14
-
15
-
16
-
17
-
18
-
19
-
20
-
21
-
22
-
23
-
24
-
25
-
26
-
27
-
28
-
29
-
30
-
31
-
32
-
33
-
34
-
35
-
36
-
37
-
38
-
39
-
40
-
41
-
42
-
43
-
44
-
45
-
46
-
47
-
48
-
49
-
50
-
51
-
52
-
 53
53 -
 54
54 -
 55
55 -
 56
56 -
 57
57 -
 58
58 -
 59
59 -
 60
60 -
 61
61 -
 62
62 -
 63
63 -
64
-
65
-
66
-
67
-
68
-
69
-
70
-
71
-
72
-
73
-
74
-
75
-
76
-
77
-
78
-
79
-
80
-
81
-
82
-
83
-
84
-
85
-
86
-
87
-
88
-
89
-
90
-
91
-
92
-
93
-
94
-
95
-
96
-
97
-
98
-
99
-
100
-
101
-
102
-
103
-
104
-
105
-
106
-
107
-
108
-
109
-
110
-
111
-
112
-
113
-
114
-
115
-
116
-
117
-
118
-
119
-
120
-
121
-
122
-
123
-
124
-
125
-
126
-
127
-
128
-
129
-
130
-
131
-
132
-
133
-
134
-
135
-
136
-
137
-
138
-
139
-
140
-
141
 |
 |
