Motorola V3X User Manual - Page 14
Belt Clip, Universal Phone Holder UPH
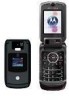 |
View all Motorola V3X manuals
Add to My Manuals
Save this manual to your list of manuals |
Page 14 highlights
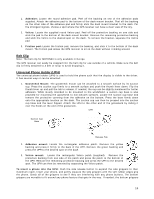
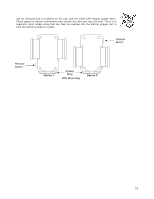
1. Adhesive: Locate the round adhesive pad. Peel off the backing on one of the adhesive pads supplied. Attach the adhesive pad to the bottom of the dash mount bracket. Peel off the backing on the other side of the adhesive pad and firmly stick the dash mount bracket to the dash. For the strongest signals, choose a spot where the GPS receiver can have a clear view of the sky. 2. Velcro: Locate the supplied round Velcro pad. Peel off the protective backing on one side and stick the pad to the bottom of the dash mount bracket. Remove the remaining protective backing and stick the Velcro to the desired spot on the dash. To remove the bracket, separate the Velcro pad. 3. Friction pad: Locate the friction pad, remove the backing, and stick it to the bottom of the dash mount. The friction pad allows the GPS receiver to sit on the dash without it sliding around. Belt Clip Note: The belt clip for MOTONAV is only available in Europe. The GPS receiver can easily be snapped into the belt clip for use outside of a vehicle. Make sure the belt clip is firmly attached to a belt or strap to avoid dropping it. Universal Phone Holder (UPH) The universal phone holder (UPH) is used to hold the phone such that the display is visible to the driver. It has several ways it can be attached: 1. Gooseneck Mount: The gooseneck mount can be attached to a smooth surface by its suction cup. Press the suction cup firmly to a smooth surface and push the thumb lever down. Flip the thumb lever up and pull the tab to release. If needed, the cup can be slightly moistened for better adhesion. While mostly intended to be mounted to the windshield, a suction cup base is also provided for mounting the gooseneck to non-smooth surfaces. Locate the suction cup base and remove the protective covering from the adhesive on the bottom. Press the base firmly down onto the appropriate location on the dash. The suction cup can then be pressed into the suction cup base and the lever flipped. Attach the UPH to the other end of the gooseneck by sliding it over the hooks on the end of the gooseneck. UPH Suction Cup Base Release Tab 2. Adhesive mount: Locate the rectangular adhesive patch. Remove the yellow backing and press it firmly to the back of the UPH. Remove the green backing and press the UPH to the desired spot on the dash. 3. Velcro mount: Locate the rectangular Velcro patch (supplied). Remove the protective backing from one side of the patch and press the patch to the bottom of the UPH. Remove the remaining protective backing and press the UPH to the desired spot. The UPH can then be removed by separating the Velcro patch. To insert a phone into the UPH: Push the side release button to expand the side grippers to their maximum reach. Insert your phone, and gently squeeze the side grippers until the soft rubber edges grip the phone. Check all of the grippers to see if they are interfering with any phone buttons. The bottom grippers are movable to fit around any phone feature that gets in the way. If needed, the bottom grippers 14
-
 1
1 -
2
-
3
-
4
-
5
-
6
-
7
-
8
-
 9
9 -
 10
10 -
 11
11 -
 12
12 -
 13
13 -
 14
14 -
 15
15 -
 16
16 -
 17
17 -
 18
18 -
 19
19 -
20
-
21
-
22
-
23
-
24
-
25
-
26
-
27
-
28
-
29
-
30
-
31
-
32
-
33
-
34
-
35
-
36
-
37
-
38
-
39
-
40
-
41
-
42
-
43
-
44
-
45
-
46
 |
 |
