NEC LCD3090W-BK-SV MultiSync LCD2090UXi-BK-SV : spectraview II user's guide - Page 17
Custom White Point dialog
 |
UPC - 805736021981
View all NEC LCD3090W-BK-SV manuals
Add to My Manuals
Save this manual to your list of manuals |
Page 17 highlights
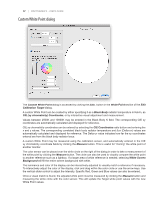
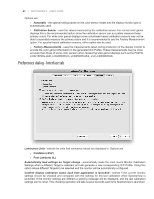
17 | SPECTRAVIEW II - USER'S GUIDE Custom White Point dialog The Custom White Point dialog is accessed by clicking the Edit.. button in the White Point section of the Edit Calibration Target dialog. A custom White Point can be created by either specifying it as a Black Body radiator temperature in Kelvin, as CIE (xy chromaticity) Coordinates, or by interactive visual adjustment and measurement. Values between 2500K and 10000K may be entered in the Black Body K field. The corresponding CIE xy coordinates are automatically calculated and displayed for reference. CIE xy chromaticity coordinates can be entered by selecting the CIE Coordinates radio button and entering the x and y values. The corresponding correlated black body radiator temperature and Δuv (Delta-uv) values are automatically calculated and displayed for reference. The Delta-uv value indicates how far the xy coordinates entered are from the black body radiator locus. A custom White Point may be measured using the calibration sensor, and automatically entered in the CIE xy chromaticity coordinate fields by clicking the Measure button. This is useful for "cloning" the white point of another monitor. The color sensor can be placed over the white circle on the right of the dialog in order to take a measurement of the white point by clicking the Measure button. The circle can also be used to visually compare the white point to another reference such as a lightbox. If a larger area of white reference is needed, selecting White Screen Background will fill the entire screen background with white. The luminance and color of the display can be interactively adjusted to visually match a reference if necessary. To interactively adjust the color of the display, click and drag within the color circle or use the arrow keys. Use the vertical slider control to adjust the Intensity. Specific Red, Green and Blue values can also be entered. Once a visual match is found, the adjusted white point must be measured by clicking the Measure button and measuring the white circle with the color sensor. This will update the Target white point values with the new White Point values.
-
 1
1 -
2
-
3
-
4
-
5
-
6
-
7
-
8
-
9
-
10
-
11
-
 12
12 -
 13
13 -
 14
14 -
 15
15 -
 16
16 -
 17
17 -
 18
18 -
 19
19 -
 20
20 -
 21
21 -
 22
22 -
23
-
24
-
25
-
26
-
27
-
28
-
29
-
30
-
31
-
32
-
33
-
34
-
35
-
36
-
37
-
38
-
39
-
40
-
41
-
42
-
43
-
44
-
45
-
46
-
47
-
48
-
49
-
50
-
51
-
52
 |
 |
