NVIDIA FX4500 User Guide - Page 25
Applying Gamma Correction, Gamma Correction tab.
 |
UPC - 054213211456
View all NVIDIA FX4500 manuals
Add to My Manuals
Save this manual to your list of manuals |
Page 25 highlights
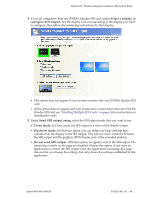
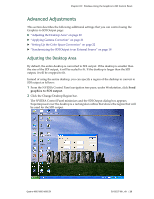
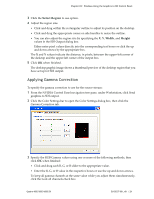
Chapter 03 : Windows-Using the Graphics to SDI Control Panel 3 Click the Select Region to use option. 4 Adjust the region size. • Click and drag within the rectangular outline to adjust its position on the desktop. • Click and drag the appropriate corner or side handles to resize the outline. • You can also adjust the region size by specifying the X, Y, Width, and Height values in the SDI Output dialog box. Either enter pixel values directly into the corresponding text boxes or click the up and down arrows by the appropriate box. The X and Y values indicate the distance, in pixels, between the upper‐left corner of the desktop and the upper‐left corner of the output box. 5 Click OK when finished. The desktop graphic image shows a thumbnail preview of the desktop region that you have set up for SDI output. Applying Gamma Correction To specify the gamma correction to use for the source stream: 1 From the NVIDIA Control Panel navigation tree pane, under Workstation, click Send graphics to SDI output. 2 Click the Color Settings bar to open the Color Settings dialog box, then click the Gamma Correction tab. 3 Specify the RGB Gamma values using one or more of the following methods, then click OK when finished: • Click and drag each R, G, or B slider to the appropriate value. • Enter the R, G, or B value in the respective boxes or use the up and down arrows. To keep all gamma channels at the same value while you adjust them simultaneously, click the Lock all channels check box. Quadro 4000/5000/6000 SDI DU-05337-001_v01 | 21
-
 1
1 -
2
-
3
-
4
-
5
-
6
-
7
-
8
-
9
-
10
-
11
-
12
-
13
-
14
-
15
-
16
-
17
-
18
-
19
-
 20
20 -
 21
21 -
 22
22 -
 23
23 -
 24
24 -
 25
25 -
 26
26 -
 27
27 -
 28
28 -
 29
29 -
 30
30 -
31
-
32
-
33
-
34
-
35
-
36
-
37
-
38
-
39
-
40
-
41
-
42
-
43
-
44
-
45
-
46
-
47
-
48
-
49
-
50
-
51
-
52
-
53
-
54
-
55
-
56
-
57
-
58
-
59
-
60
-
61
-
62
-
63
-
64
-
65
-
66
-
67
-
68
-
69
-
70
-
71
-
72
-
73
-
74
-
75
-
76
-
77
-
78
-
79
-
80
-
81
-
82
-
83
-
84
-
85
-
86
-
87
-
88
-
89
-
90
-
91
-
92
-
93
-
94
-
95
-
96
 |
 |
