Netgear DGND3700v2 [English]: DGND3700v2 User Manual(PDF) - Page 110
Advanced Setup > Dynamic DNS, To set up Dynamic DNS, Use a Dynamic DNS Service, Apply, check box.
 |
View all Netgear DGND3700v2 manuals
Add to My Manuals
Save this manual to your list of manuals |
Page 110 highlights
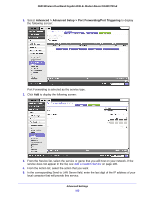
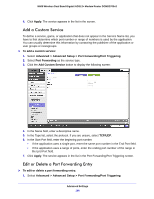
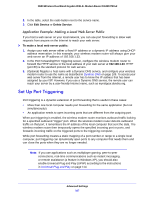
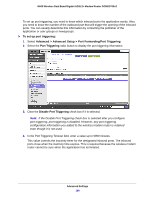
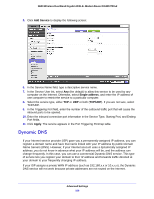
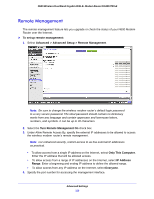
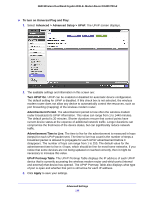
N600 Wireless Dual Band Gigabit ADSL2+ Modem Router DGND3700v2 Your wireless modem router contains a client that can connect to the Dynamic DNS service provided by DynDNS.org. First visit their website at http://www.dyndns.org and obtain an account and host name that you configure in the wireless modem router. Then, whenever your ISP-assigned IP address changes, your wireless modem router automatically contacts the Dynamic DNS service provider, logs in to your account, and registers your new IP address. If your host name is hostname, for example, you can reach your wireless modem router at http://hostname.dyndns.org. On the Advanced tab, select Advanced Setup > Dynamic DNS to display the following screen: Figure 12. Forward traffic to a changing IP address To set up Dynamic DNS: 1. Register for an account with one of the Dynamic DNS service providers whose names appear in the Service Provider list. For example, for DynDNS.org, select www.dyndns.org. 2. Select the Use a Dynamic DNS Service check box. 3. Select the name of your Dynamic DNS service provider. 4. Type the host name (or domain name) that your Dynamic DNS service provider gave you. 5. Type the user name for your Dynamic DNS account. This is the name that you use to log in to your account, not your host name. 6. Type the password (or key) for your Dynamic DNS account. 7. Click Apply to save your configuration. Advanced Settings 110
-
 1
1 -
2
-
3
-
4
-
5
-
6
-
7
-
8
-
9
-
10
-
11
-
12
-
13
-
14
-
15
-
16
-
17
-
18
-
19
-
20
-
21
-
22
-
23
-
24
-
25
-
26
-
27
-
28
-
29
-
30
-
31
-
32
-
33
-
34
-
35
-
36
-
37
-
38
-
39
-
40
-
41
-
42
-
43
-
44
-
45
-
46
-
47
-
48
-
49
-
50
-
51
-
52
-
53
-
54
-
55
-
56
-
57
-
58
-
59
-
60
-
61
-
62
-
63
-
64
-
65
-
66
-
67
-
68
-
69
-
70
-
71
-
72
-
73
-
74
-
75
-
76
-
77
-
78
-
79
-
80
-
81
-
82
-
83
-
84
-
85
-
86
-
87
-
88
-
89
-
90
-
91
-
92
-
93
-
94
-
95
-
96
-
97
-
98
-
99
-
100
-
101
-
102
-
103
-
104
-
 105
105 -
 106
106 -
 107
107 -
 108
108 -
 109
109 -
 110
110 -
 111
111 -
 112
112 -
 113
113 -
 114
114 -
 115
115 -
116
-
117
-
118
-
119
-
120
-
121
-
122
-
123
-
124
-
125
-
126
-
127
-
128
-
129
-
130
-
131
-
132
-
133
-
134
-
135
-
136
-
137
-
138
-
139
-
140
-
141
-
142
 |
 |
