Nikon 25214 D70 User's Guide - Page 112
Flash Exposure Compensation, Using Flash Exposure Compensation with Optional Speedlights, EV Step
 |
UPC - 018208252145
View all Nikon 25214 manuals
Add to My Manuals
Save this manual to your list of manuals |
Page 112 highlights
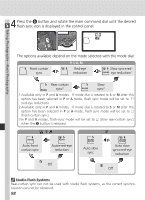
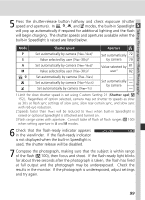
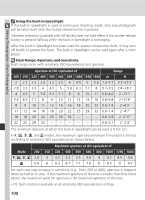
Taking Photographs-Flash Photography Flash Exposure Compensation In P, S, A, and M modes, flash exposure compensation can be used to increase or reduce flash output from the level chosen by the camera's flash control system (flash exposure compensation is not available in Digital Vari-Program modes). Flash output can be increased to make the main subject appear brighter, or reduced to prevent unwanted highlights or reflections. As a rule of thumb, positive compensation may be needed when the main subject is darker than the background, negative compensation when the main subject is brighter than the background. 1 Rotate the mode dial to P, S, A, or M and choose a flash sync mode as described in Steps 1-4 of "Using the Built-in Speedlight" ( 97-98). 2 Pressing the button, rotate the sub-command dial and confirm flash exposure compensation in the control panel or viewfinder. Flash exposure compensation can be set to values between -3 EV (darker) and +1 EV (brighter) in increments of 1/3 EV. At values other than ±0, a icon will be displayed in the control panel and viewfinder after you release the button. The current value for flash exposure compensation can be confirmed by pressing the button. 3 Take a picture as instructed in Steps 5-7 of "Using the Built-in Speedlight" ( 99). Normal flash output can be restored by setting flash exposure compensation to ±0.0 or performing a two button reset ( 111). Flash exposure compensation is not reset when the camera is turned off. Using Flash Exposure Compensation with Optional Speedlights Flash exposure compensation is also available with optional SB-800 and SB-600 Speedlights. 9-EV Step ( 144) This option can be used to set the increments for flash compensation to ½ EV. 102
-
 1
1 -
2
-
3
-
4
-
5
-
6
-
7
-
8
-
9
-
10
-
11
-
12
-
13
-
14
-
15
-
16
-
17
-
18
-
19
-
20
-
21
-
22
-
23
-
24
-
25
-
26
-
27
-
28
-
29
-
30
-
31
-
32
-
33
-
34
-
35
-
36
-
37
-
38
-
39
-
40
-
41
-
42
-
43
-
44
-
45
-
46
-
47
-
48
-
49
-
50
-
51
-
52
-
53
-
54
-
55
-
56
-
57
-
58
-
59
-
60
-
61
-
62
-
63
-
64
-
65
-
66
-
67
-
68
-
69
-
70
-
71
-
72
-
73
-
74
-
75
-
76
-
77
-
78
-
79
-
80
-
81
-
82
-
83
-
84
-
85
-
86
-
87
-
88
-
89
-
90
-
91
-
92
-
93
-
94
-
95
-
96
-
97
-
98
-
99
-
100
-
101
-
102
-
103
-
104
-
105
-
106
-
 107
107 -
 108
108 -
 109
109 -
 110
110 -
 111
111 -
 112
112 -
 113
113 -
 114
114 -
 115
115 -
 116
116 -
 117
117 -
118
-
119
-
120
-
121
-
122
-
123
-
124
-
125
-
126
-
127
-
128
-
129
-
130
-
131
-
132
-
133
-
134
-
135
-
136
-
137
-
138
-
139
-
140
-
141
-
142
-
143
-
144
-
145
-
146
-
147
-
148
-
149
-
150
-
151
-
152
-
153
-
154
-
155
-
156
-
157
-
158
-
159
-
160
-
161
-
162
-
163
-
164
-
165
-
166
-
167
-
168
-
169
-
170
-
171
-
172
-
173
-
174
-
175
-
176
-
177
-
178
-
179
-
180
-
181
-
182
-
183
-
184
-
185
-
186
-
187
-
188
-
189
-
190
-
191
-
192
-
193
-
194
-
195
-
196
-
197
-
198
-
199
-
200
-
201
-
202
-
203
-
204
-
205
-
206
-
207
-
208
-
209
-
210
-
211
-
212
-
213
-
214
-
215
-
216
-
217
-
218
 |
 |
