Nikon Coolpix 8800 User Manual - Page 136
Auto Transfer
 |
UPC - 018208255238
View all Nikon Coolpix 8800 manuals
Add to My Manuals
Save this manual to your list of manuals |
Page 136 highlights
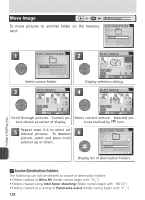
Auto Transfer Auto transfer When the camera is connected to a computer running PictureProject, pictures can be transferred (copied) to the computer ( 76). PictureProject can be used to transfer all pictures or only those pictures selected in advance using Auto transfer (in playback mode, these pictures are indicated by a icon). For more information, see the Quick Start Guide and the PictureProject Reference Manual. AUTO TRANSFER Selected images All images Cancel transfer Option Description Selected images Select pictures for transfer. All images Mark all pictures for transfer. Cancel transfer Remove transfer marking from all pictures. Marking Selected Pictures for Transfer 1 AUTO TRANSFER 2 SELECTED IMAGES Selected images All images Cancel transfer Highlight Selected images. 10.01.2004 10:35 Back ON OFF [ 4/ 4] Set Display selection dialog. 3 SELECTED IMAGES 4 SELECTED IMAGES 10.01.2004 10:25 Back ON OFF [ 2/ 4] Set Scroll through pictures. Current picture shown at center of display. 10.01.2004 10:25 Back ON OFF [ 2/ 4] Set Select current picture. Selected pictures marked by icon. 5 Repeat steps 3-4 to select additional pictures. To deselect picture, select and press multi selector up or down. The Playback Menu 126
-
 1
1 -
2
-
3
-
4
-
5
-
6
-
7
-
8
-
9
-
10
-
11
-
12
-
13
-
14
-
15
-
16
-
17
-
18
-
19
-
20
-
21
-
22
-
23
-
24
-
25
-
26
-
27
-
28
-
29
-
30
-
31
-
32
-
33
-
34
-
35
-
36
-
37
-
38
-
39
-
40
-
41
-
42
-
43
-
44
-
45
-
46
-
47
-
48
-
49
-
50
-
51
-
52
-
53
-
54
-
55
-
56
-
57
-
58
-
59
-
60
-
61
-
62
-
63
-
64
-
65
-
66
-
67
-
68
-
69
-
70
-
71
-
72
-
73
-
74
-
75
-
76
-
77
-
78
-
79
-
80
-
81
-
82
-
83
-
84
-
85
-
86
-
87
-
88
-
89
-
90
-
91
-
92
-
93
-
94
-
95
-
96
-
97
-
98
-
99
-
100
-
101
-
102
-
103
-
104
-
105
-
106
-
107
-
108
-
109
-
110
-
111
-
112
-
113
-
114
-
115
-
116
-
117
-
118
-
119
-
120
-
121
-
122
-
123
-
124
-
125
-
126
-
127
-
128
-
129
-
130
-
 131
131 -
 132
132 -
 133
133 -
 134
134 -
 135
135 -
 136
136 -
 137
137 -
 138
138 -
 139
139 -
 140
140 -
 141
141 -
142
-
143
-
144
-
145
-
146
-
147
-
148
-
149
-
150
-
151
-
152
-
153
-
154
-
155
-
156
-
157
-
158
-
159
-
160
-
161
-
162
-
163
-
164
-
165
-
166
-
167
-
168
-
169
-
170
 |
 |
