Nikon D2H D2H User's Manual - Page 77
Image Adjustment, Making Edges More Distinct
 |
UPC - 018208252084
View all Nikon D2H manuals
Add to My Manuals
Save this manual to your list of manuals |
Page 77 highlights
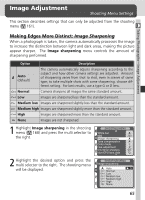
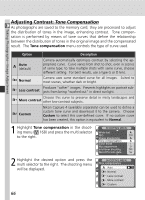
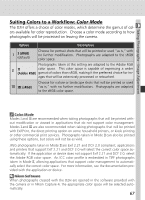
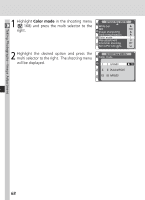
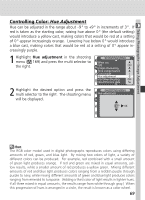
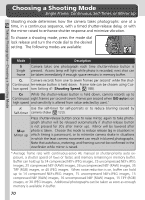
Image Adjustment Shooting Menu Settings This section describes settings that can only be adjusted from the shooting menu ( 161). Taking Photographs-Image Adjustment Making Edges More Distinct: Image Sharpening When a photograph is taken, the camera automatically processes the image to increase the distinction between light and dark areas, making the picture appear sharper. The Image sharpening menu controls the amount of sharpening performed. Option Description Auto (default) The camera automatically adjusts sharpening according to the subject and how other camera settings are adjusted. Amount of sharpening varies from shot to shot, even in scenes of same type; to take multiple shots with same sharpening, choose different setting. For best results, use a type G or D lens. Normal Camera sharpens all images the same standard amount. Low Images are sharpened less than the standard amount. Medium low Images are sharpened slightly less than the standard amount. Medium high Images are sharpened slightly more than the standard amount. High Images are sharpened more than the standard amount. None Images are not sharpened. 1 Highlight Image sharpening in the shooting menu ( 168) and press the multi selector to the right. SHOOTING MENU White bal. A ISO 200 Image sharpening A Tone compensation A Color mode I Hue adjustment 0° Intvl timer shooting OFF Non-CPU lens data 2 Highlight the desired option and press the multi selector to the right. The shooting menu will be displayed. SHOOTING MENU Image sharpening Auto OK Normal Low Medium low Medium high High None 65
-
 1
1 -
2
-
3
-
4
-
5
-
6
-
7
-
8
-
9
-
10
-
11
-
12
-
13
-
14
-
15
-
16
-
17
-
18
-
19
-
20
-
21
-
22
-
23
-
24
-
25
-
26
-
27
-
28
-
29
-
30
-
31
-
32
-
33
-
34
-
35
-
36
-
37
-
38
-
39
-
40
-
41
-
42
-
43
-
44
-
45
-
46
-
47
-
48
-
49
-
50
-
51
-
52
-
53
-
54
-
55
-
56
-
57
-
58
-
59
-
60
-
61
-
62
-
63
-
64
-
65
-
66
-
67
-
68
-
69
-
70
-
71
-
 72
72 -
 73
73 -
 74
74 -
 75
75 -
 76
76 -
 77
77 -
 78
78 -
 79
79 -
 80
80 -
 81
81 -
 82
82 -
83
-
84
-
85
-
86
-
87
-
88
-
89
-
90
-
91
-
92
-
93
-
94
-
95
-
96
-
97
-
98
-
99
-
100
-
101
-
102
-
103
-
104
-
105
-
106
-
107
-
108
-
109
-
110
-
111
-
112
-
113
-
114
-
115
-
116
-
117
-
118
-
119
-
120
-
121
-
122
-
123
-
124
-
125
-
126
-
127
-
128
-
129
-
130
-
131
-
132
-
133
-
134
-
135
-
136
-
137
-
138
-
139
-
140
-
141
-
142
-
143
-
144
-
145
-
146
-
147
-
148
-
149
-
150
-
151
-
152
-
153
-
154
-
155
-
156
-
157
-
158
-
159
-
160
-
161
-
162
-
163
-
164
-
165
-
166
-
167
-
168
-
169
-
170
-
171
-
172
-
173
-
174
-
175
-
176
-
177
-
178
-
179
-
180
-
181
-
182
-
183
-
184
-
185
-
186
-
187
-
188
-
189
-
190
-
191
-
192
-
193
-
194
-
195
-
196
-
197
-
198
-
199
-
200
-
201
-
202
-
203
-
204
-
205
-
206
-
207
-
208
-
209
-
210
-
211
-
212
-
213
-
214
-
215
-
216
-
217
-
218
-
219
-
220
-
221
-
222
-
223
-
224
-
225
-
226
-
227
-
228
-
229
-
230
-
231
-
232
-
233
-
234
-
235
-
236
-
237
-
238
-
239
-
240
-
241
-
242
-
243
-
244
-
245
-
246
-
247
-
248
-
249
-
250
-
251
-
252
-
253
-
254
-
255
-
256
-
257
-
258
-
259
-
260
-
261
-
262
-
263
-
264
 |
 |
