Nikon D3000 D3000 User's Manual - Page 148
Auto off Timers, Acquire dust off reference data.
 |
UPC - 018208254620
View all Nikon D3000 manuals
Add to My Manuals
Save this manual to your list of manuals |
Page 148 highlights
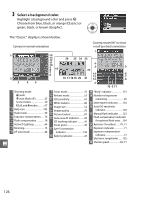
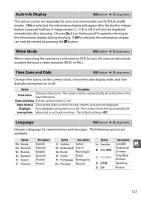
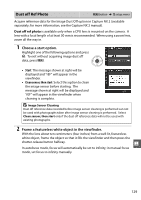
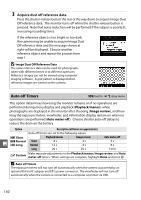
3 Acquire dust off reference data. Press the shutter-release button the rest of the way down to acquire Image Dust Off reference data. The monitor turns off when the shutter-release button is pressed. Note that noise reduction will be performed if the subject is poorly lit, increasing recording times. If the reference object is too bright or too dark, the camera may be unable to acquire Image Dust Off reference data and the message shown at right will be displayed. Choose another reference object and repeat the process from step 1. D Image Dust Off Reference Data The same reference data can be used for photographs taken with different lenses or at different apertures. Reference images can not be viewed using computer imaging software. A grid pattern is displayed when reference images are viewed on the camera. Auto off Timers G button ➜ B setup menu This option determines how long the monitor remains on if no operations are performed during menu display and playback (Playback/menus), while photographs are displayed in the monitor after shooting (Image review), and how long the exposure meters, viewfinder, and information display remain on when no operations are performed (Auto meter-off ). Choose shorter auto-off delays to reduce the drain on the battery. Option Description (all times are approximate) Auto-off timers are set to the following values: C Short Playback/menus Image review g D Normal Short E Long Normal 8s 12 s 4s 4s Long 20 s 20 s Auto meter-off 4s 8s 1 min. F Custom Make separate adjustments to the Playback/menus, Image review, and Auto meter-off timers. When settings are complete, highlight Done and press J. A Auto off Timers The exposure meters will not turn off automatically when the camera is powered by an optional EH-5a AC adapter and EP-5 power connector. The viewfinder will not turn off automatically when the camera is connected to a computer or printer via USB. 130
-
 1
1 -
2
-
3
-
4
-
5
-
6
-
7
-
8
-
9
-
10
-
11
-
12
-
13
-
14
-
15
-
16
-
17
-
18
-
19
-
20
-
21
-
22
-
23
-
24
-
25
-
26
-
27
-
28
-
29
-
30
-
31
-
32
-
33
-
34
-
35
-
36
-
37
-
38
-
39
-
40
-
41
-
42
-
43
-
44
-
45
-
46
-
47
-
48
-
49
-
50
-
51
-
52
-
53
-
54
-
55
-
56
-
57
-
58
-
59
-
60
-
61
-
62
-
63
-
64
-
65
-
66
-
67
-
68
-
69
-
70
-
71
-
72
-
73
-
74
-
75
-
76
-
77
-
78
-
79
-
80
-
81
-
82
-
83
-
84
-
85
-
86
-
87
-
88
-
89
-
90
-
91
-
92
-
93
-
94
-
95
-
96
-
97
-
98
-
99
-
100
-
101
-
102
-
103
-
104
-
105
-
106
-
107
-
108
-
109
-
110
-
111
-
112
-
113
-
114
-
115
-
116
-
117
-
118
-
119
-
120
-
121
-
122
-
123
-
124
-
125
-
126
-
127
-
128
-
129
-
130
-
131
-
132
-
133
-
134
-
135
-
136
-
137
-
138
-
139
-
140
-
141
-
142
-
 143
143 -
 144
144 -
 145
145 -
 146
146 -
 147
147 -
 148
148 -
 149
149 -
 150
150 -
 151
151 -
 152
152 -
 153
153 -
154
-
155
-
156
-
157
-
158
-
159
-
160
-
161
-
162
-
163
-
164
-
165
-
166
-
167
-
168
-
169
-
170
-
171
-
172
-
173
-
174
-
175
-
176
-
177
-
178
-
179
-
180
-
181
-
182
-
183
-
184
-
185
-
186
-
187
-
188
-
189
-
190
-
191
-
192
-
193
-
194
-
195
-
196
-
197
-
198
-
199
-
200
-
201
-
202
-
203
-
204
-
205
-
206
-
207
-
208
-
209
-
210
-
211
-
212
-
213
-
214
-
215
-
216
 |
 |
