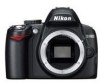
Nikon D3000 D3000 User's Manual - Page 75
Before Using the Remote Control, Using the Built-in Flash, Button, See Also
 |
UPC - 018208254620
View all Nikon D3000 manuals
Add to My Manuals
Save this manual to your list of manuals |
Page 75 highlights
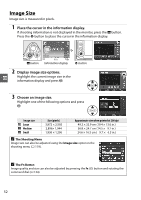
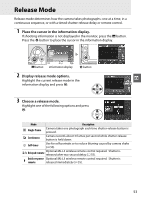
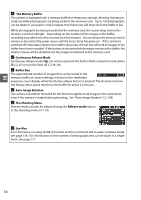
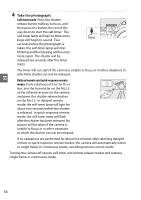
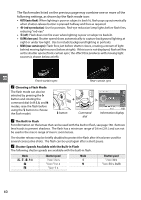
D Before Using the Remote Control Before using the remote control for the first time, remove the clear plastic battery insulator sheet. D Using the Built-in Flash Before taking a photograph with the flash in P, S, A, or M modes, press the M button to raise the flash and wait for the M indicator to be displayed in the viewfinder (0 58). Shooting will be interrupted if the flash is raised after the self-timer or delayed remote timer has started. In auto or scene modes in which the flash pops up automatically, the flash will begin charging when delayed remote or quick-response remote mode is selected; once the flash is charged, it will automatically pop up and fire if required when the shutter-release button on the ML-L3 is pressed. The camera will only respond to the shutter-release button on the ML-L3 once the flash has charged. In flash modes that support red-eye reduction, the red-eye reduction lamp will light for about one second before the shutter is released. In delayed remote mode, the self-timer lamp will light for two seconds, followed by the red-eye reduction lamp, which lights for one second before the shutter is released to reduce red-eye. A The E Button z Self-timer mode can also be selected by pressing the E button (0 134). E button A See Also For information on changing the duration of the self-timer, see page 131. For information on choosing the length of time the camera will remain in standby mode before remote control mode is cancelled, see page 131. For information on controlling the beeps that sound when the self-timer and remote control are used, see page 131. 57
-
 1
1 -
2
-
3
-
4
-
5
-
6
-
7
-
8
-
9
-
10
-
11
-
12
-
13
-
14
-
15
-
16
-
17
-
18
-
19
-
20
-
21
-
22
-
23
-
24
-
25
-
26
-
27
-
28
-
29
-
30
-
31
-
32
-
33
-
34
-
35
-
36
-
37
-
38
-
39
-
40
-
41
-
42
-
43
-
44
-
45
-
46
-
47
-
48
-
49
-
50
-
51
-
52
-
53
-
54
-
55
-
56
-
57
-
58
-
59
-
60
-
61
-
62
-
63
-
64
-
65
-
66
-
67
-
68
-
69
-
 70
70 -
 71
71 -
 72
72 -
 73
73 -
 74
74 -
 75
75 -
 76
76 -
 77
77 -
 78
78 -
 79
79 -
 80
80 -
81
-
82
-
83
-
84
-
85
-
86
-
87
-
88
-
89
-
90
-
91
-
92
-
93
-
94
-
95
-
96
-
97
-
98
-
99
-
100
-
101
-
102
-
103
-
104
-
105
-
106
-
107
-
108
-
109
-
110
-
111
-
112
-
113
-
114
-
115
-
116
-
117
-
118
-
119
-
120
-
121
-
122
-
123
-
124
-
125
-
126
-
127
-
128
-
129
-
130
-
131
-
132
-
133
-
134
-
135
-
136
-
137
-
138
-
139
-
140
-
141
-
142
-
143
-
144
-
145
-
146
-
147
-
148
-
149
-
150
-
151
-
152
-
153
-
154
-
155
-
156
-
157
-
158
-
159
-
160
-
161
-
162
-
163
-
164
-
165
-
166
-
167
-
168
-
169
-
170
-
171
-
172
-
173
-
174
-
175
-
176
-
177
-
178
-
179
-
180
-
181
-
182
-
183
-
184
-
185
-
186
-
187
-
188
-
189
-
190
-
191
-
192
-
193
-
194
-
195
-
196
-
197
-
198
-
199
-
200
-
201
-
202
-
203
-
204
-
205
-
206
-
207
-
208
-
209
-
210
-
211
-
212
-
213
-
214
-
215
-
216
 |
 |
