Nokia 8860 Nokia 8860 User Guide in English - Page 47
• NAM selection, For example, your phone can be activated in up to 3 different service areas
 |
View all Nokia 8860 manuals
Add to My Manuals
Save this manual to your list of manuals |
Page 47 highlights
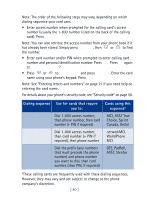
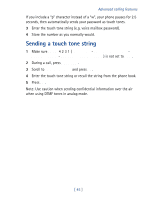
Note: Before you can activate the send own number feature, you must first store the feature code given to you by your service provider. Otherwise, this feature may not appear in the menu. See "Network feature setting" on page 65 for more details. Note: This feature is only effective when calling to a number that is equipped with Caller ID. 1 Press Menu 4 4 4 (Settings - Network services - Send own number). 2 Scroll to Yes (to show your number) or No (to not show it). 3 Press OK. 4 Enter the number you wish to call (or press Search to retrieve the number from the phone book and press OK), then press OK. Your phone attempts to call this number with the feature code you stored in Menu 4 4 5 (see "Network feature setting" on page 65). • NAM selection The service provider programs your phone with the phone number and system information into your phone's memory when your phone is first activated. This is called a Number Assignment Module (NAM). For example, your phone can be activated in up to 3 different service areas (e.g. one in Dallas, another in Chicago, and maybe one more in New York), each giving your phone a different phone number or account. Only one number can be active at a time. When you select a phone number, you're also selecting which system you're using as your home system (see "System" on page 66). The first phone number displayed with this menu is the currently selected number. Note: It may not be necessary to have three NAMs for your phone if your service provider has service or roaming agreements for each area in which you wish to use your phone. Contact your service provider for details. [ 42 ]
-
 1
1 -
2
-
3
-
4
-
5
-
6
-
7
-
8
-
9
-
10
-
11
-
12
-
13
-
14
-
15
-
16
-
17
-
18
-
19
-
20
-
21
-
22
-
23
-
24
-
25
-
26
-
27
-
28
-
29
-
30
-
31
-
32
-
33
-
34
-
35
-
36
-
37
-
38
-
39
-
40
-
41
-
 42
42 -
 43
43 -
 44
44 -
 45
45 -
 46
46 -
 47
47 -
 48
48 -
 49
49 -
 50
50 -
 51
51 -
 52
52 -
53
-
54
-
55
-
56
-
57
-
58
-
59
-
60
-
61
-
62
-
63
-
64
-
65
-
66
-
67
-
68
-
69
-
70
-
71
-
72
-
73
-
74
-
75
-
76
-
77
-
78
-
79
-
80
-
81
-
82
-
83
-
84
-
85
-
86
-
87
-
88
-
89
-
90
-
91
-
92
-
93
-
94
-
95
-
96
-
97
-
98
-
99
-
100
-
101
-
102
-
103
-
104
-
105
-
106
-
107
-
108
-
109
-
110
-
111
-
112
-
113
 |
 |