Oki OKIPAGE14e English:OKIPAGE 14e Setup Guide - Page 15
USB Interface, Turning on the Printer
 |
View all Oki OKIPAGE14e manuals
Add to My Manuals
Save this manual to your list of manuals |
Page 15 highlights
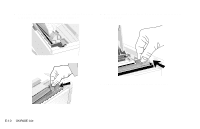
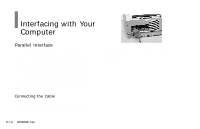
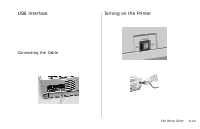
USB Interface Requires a USB cable. The cable must meet USB Rev 1.1 specification for normal operation, and be UL/CM/CSA approved. ! OKI DATA has tested and approved the following USB cable: Part Number 70037901. Cable Length: 10 ft. (3.048 meters). See Service and Support in the User's Guide for purchasing information. Connecting the Cable Make sure the printer and computer are off. 1 Insert the printer end of the cable firmly into the proper connector on the back of the printer. Fasten the cable to the printer securely. Turning on the Printer 1 Make sure the printer is off. POWER OFF ON F 2 Plug the cord into the printer first, then into a grounded outlet. 2 Connect the other end of the cable to the proper connector on your computer. Fasten the cable securely to your computer. 3 Turn the printer on. It takes about 10 seconds for the printer to initialize and warm up, and for the Ready light on the operator panel to turn on, indicating the printer is ready to receive data. | 14e Setup Guide E-15
-
 1
1 -
2
-
3
-
4
-
5
-
6
-
7
-
8
-
9
-
 10
10 -
 11
11 -
 12
12 -
 13
13 -
 14
14 -
 15
15 -
 16
16 -
 17
17 -
 18
18 -
 19
19 -
 20
20 -
21
-
22
-
23
-
24
-
25
-
26
-
27
-
28
 |
 |
