Onkyo BD-SP809 Owner Manual - Page 11
FUNCTIONAL OVERVIEW, 4.1 Front Panel, 4.2 Rear Panel, 4.3 Remote Control - - blu ray disc player
 |
View all Onkyo BD-SP809 manuals
Add to My Manuals
Save this manual to your list of manuals |
Page 11 highlights
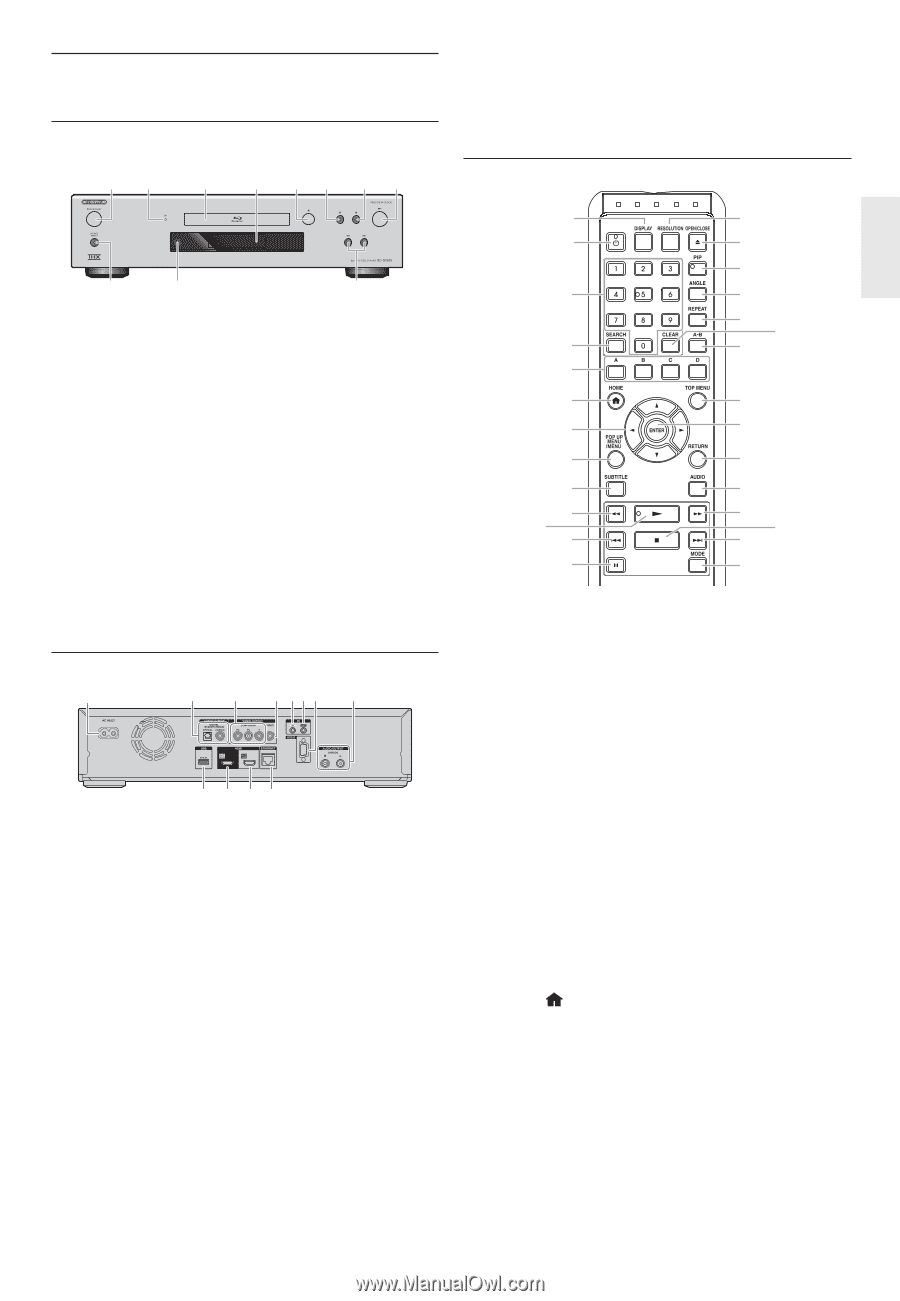
4. FUNCTIONAL OVERVIEW 4.1 Front Panel 12 3 4 5* 6 7 8* 11 10 9 * The unit can also be turned on by pressing these buttons. 1. . ON/STANDBY button 2. 3D indicator 3. Disc tray 4. Display 5. fl (open/close) button* 6. Δ (pause) button 7. Ê (stop) button 8. B (play) button* 9. H / G (skip down / up) buttons 10. Infrared sensor window 11. SOURCE DIRECT button 4.2 Rear Panel 1 2 3 4 567 8 12 11 10 9 1. AC INLET terminal 2. AUDIO OUTPUT (DIGITAL OPTICAL / COAXIAL) jacks 3. VIDEO OUTPUT (COMPONENT) jacks 4. VIDEO OUTPUT (VIDEO) jack 5. IR IN jack 6. IR OUT jack 7. CONTROL CONNECTOR (RS-232) 8. AUDIO OUTPUT (ANALOG L / R) jacks 9. ETHERNET terminal 10. HDMI OUT SUB jack 11. HDMI OUT MAIN jack 12. USB input C Caution • Do not touch the inner pins of the jacks on the rear panel. Electrostatic discharge may cause permanent damage to the unit. • This unit does not have an RF modulator. EN • Do not connect any device other than USB flash drive, USB card reader or USB hub into USB input. (e.g. PC, external HDD, MP3 player, digital camera, keyboard, mouse, etc.) 4.3 Remote Control 1 2 3 4 5 6 7 8 9 10 11* 12 13 14 15* 16 17 18 19 20 21 22 23 24 25 27 26 28 * The unit can also be turned on by pressing these buttons. 1. DISPLAY button • Press to display the on-screen display menu. 2. . (on/standby) button • Press to turn on the unit, or to turn the unit into the standby mode. (To completely shut down the unit, you must unplug the AC power cord.) 3. Number buttons • Press to select a chapter during playback. • Press to enter numbers in the input field. 4. SEARCH button • Press to display the search menu. 5. A / B / C / D buttons • Press to activate shortcut keys on some BD-video functions. • When file list / thumbnail list is shown, press to switch between pages. 6. HOME button • Press to display the home menu. 7 buttons • Press to select items or settings. 8. POP UP MENU / MENU button Blu-ray Disc™: • Press to display the pop-up menu. DVD: • Press to display the disc menu. 9. SUBTITLE button • Press to select subtitles on a disc. 11
-
 1
1 -
2
-
3
-
4
-
5
-
 6
6 -
 7
7 -
 8
8 -
 9
9 -
 10
10 -
 11
11 -
 12
12 -
 13
13 -
 14
14 -
 15
15 -
 16
16 -
17
-
18
-
19
-
20
-
21
-
22
-
23
-
24
-
25
-
26
-
27
-
28
-
29
-
30
-
31
-
32
-
33
-
34
-
35
-
36
-
37
-
38
-
39
-
40
-
41
-
42
-
43
-
44
-
45
-
46
-
47
-
48
-
49
-
50
-
51
-
52
-
53
-
54
-
55
-
56
-
57
-
58
-
59
-
60
-
61
-
62
-
63
-
64
-
65
 |
 |