Onkyo BD-SP809 Owner Manual - Page 43
ENTER], the Number buttons], Select Subnet Mask, Default Gateway
 |
View all Onkyo BD-SP809 manuals
Add to My Manuals
Save this manual to your list of manuals |
Page 43 highlights
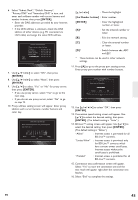
6. Select "Subnet Mask", "Default Gateway", "Primary DNS" and "Secondary DNS" in turn, and enter each address number with cursor buttons and number buttons, then press [ENTER]. • Enter the DNS addresses provided by your Internet provider. • If the DNS address is unknown, check the DNS address of other devices (e.g. PC connected via LAN cable) and assign the same DNS address. Next Cancel Network Settings (Manual) Please enter your network settings. IP Address Subnet Mask Default Gateway Primary DNS Secondary DNS 7. Use to select "OK", then press [ENTER]. 8. Use to select "Next", then press [ENTER]. 9. Use [Î / ï] to select "Yes" or "No" for proxy server, then press [ENTER]. • If you use proxy server, select "Yes" to go to the next step. • If you do not use proxy server, select "No" to go to step 13. 10. Proxy address setting screen will appear. Enter proxy address with cursor buttons, number buttons and color key. Network Settings (Manual) Please enter the Proxy Address with software keyboard. Done Cancel Clear : Move the highlight. [the Number buttons] : Enter number. [ENTER] : Enter the highlighted number or letter. [A]* : Set the entered number or letter. [B] : Exit the network setting. [C] : Clear the entered number or letter. [D]* : Switch between abc, ABC and @!?. * These buttons can be used in other network settings. 11. Press [A] to go to the proxy port setting screen. Enter proxy port number with number buttons. Network Settings (Manual) Proxy Port Please enter the Proxy Port. Cancel Clear OK Cancel 12. Use to select "OK", then press [ENTER]. 13. Connection speed setting screen will appear. Use [Î / ï] to select the desired setting, then press [ENTER]. (The default setting is "Auto".) 14. BD-Live™ setting screen will appear. Use [Î / ï] to select the desired setting, then press [ENTER]. (The default setting is "Allow".) "Allow" : Internet access is permitted for all BD-Live™ contents. "Limited Allow" : Internet access is permitted only for BD-Live™ contents which have content owner certificates. Internet access without the certificates is prohibited. "Prohibit" : Internet access is prohibited for all BD-Live™ contents. 15. Connection test confirmation screen will appear. Select "Yes" to start the connection test and the test result will appear right after the connection test finishes. 16. Select "End" to complete the settings. EN 43
-
 1
1 -
2
-
3
-
4
-
5
-
6
-
7
-
8
-
9
-
10
-
11
-
12
-
13
-
14
-
15
-
16
-
17
-
18
-
19
-
20
-
21
-
22
-
23
-
24
-
25
-
26
-
27
-
28
-
29
-
30
-
31
-
32
-
33
-
34
-
35
-
36
-
37
-
 38
38 -
 39
39 -
 40
40 -
 41
41 -
 42
42 -
 43
43 -
 44
44 -
 45
45 -
 46
46 -
 47
47 -
 48
48 -
49
-
50
-
51
-
52
-
53
-
54
-
55
-
56
-
57
-
58
-
59
-
60
-
61
-
62
-
63
-
64
-
65
 |
 |
