Onkyo HT-R540 Owner Manual - Page 36
Playing Your AV Components, Basic AV Receiver Operation - home theater
 |
View all Onkyo HT-R540 manuals
Add to My Manuals
Save this manual to your list of manuals |
Page 36 highlights
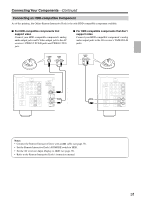
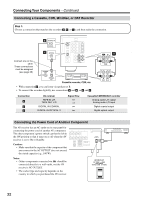
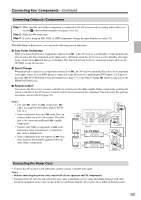
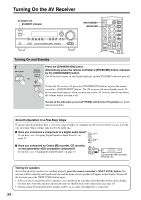
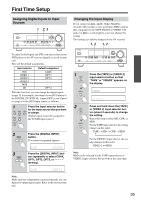
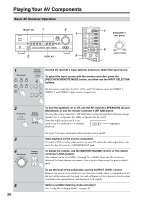
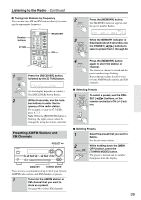
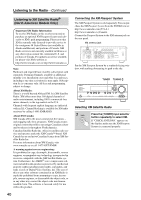
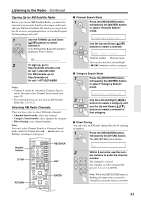
Playing Your AV Components Basic AV Receiver Operation MULTI CH 1 4 STANDBY/ON STANDBY PHONES TUNING PRESET MULTI CH DVD VIDEO 1 VIDEO 2 VIDEO 3 TAPE TUNER C D ENTER RETURN SETUP SPEAKERS A B VCR TONE STEREO LISTENING MODE DIGITAL DISPLAY INPUT TUNING DIMMER MEMORY MODE CLEAR MASTER VOLUME VIDEO 3 INPUT VIDEO L AUDIO R 2 DISPLAY 1 2 ON/STANDBY REMOTE MODE RECEIVER DVD TAPE INPUT SELECTOR 1 2 3 V1 V2 V3 M D/CDR C D HDD 4 5 6 TV MULTI CH DVD 7 8 9 VCR TAPE TUNER 10 11 +10 0 C D 12 CABLE CLR SAT D TUN --/--- ENT DIMMER SLEEP TV VOL INPUT GUIDE TOP MENU CH DISC ALBUM VOL PREVIOUS MENU SP A / B MUTING PLAYLIST/CAT ENTER PLAYLIST/CAT 1 4 Subwoofer's rear panel MIN MAX OUTPUT LEVEL 1 AV receiver DVD VIDEO 1 VIDEO 2 Remote controller RECEIVER VIDEO 3 C D VCR TAPE TUNER 1 2 V1 V2 7 TAPE 8 TUNER 3 V3 6 DVD 9 C D Use the AV receiver's input selector buttons to select the input source. To select the input source with the remote controller, press the [RECEIVER] REMOTE MODE button, and then use the INPUT SELECTOR buttons. On the remote controller, the [V1], [V2], and [V3] buttons select the VIDEO 1, VIDEO 2, and VIDEO 3 input sources respectively. 2 AV receiver SPEAKERS A B Remote controller 3 4 AV receiver MASTER VOLUME Remote controller VOL 5 36 To turn the speakers on or off, use the AV receiver's SPEAKERS [A] and [B] buttons, or use the remote controller's [SP A/B] button. Pressing the remote controller's [SP A/B] button cycles through the following settings: Speaker Set A → Speaker Set A&B → Speaker Set B → Off. Note that while speaker set B is on, speaker set A is reduced to 5.1-channel Indicators playback. See page 5 for more information about speaker sets A and B. Start playback on the source component. To watch a DVD or other video source, on your TV, select the video input that's connected to the AV receiver's MONITOR OUT jack. To adjust the volume, use the MASTER VOLUME control, or the remote controller's [VOL] button. The volume can be set to MIN, 1 through 79, or MAX. Since the AV receiver is designed for home theater enjoyment, it has a wide volume range for precise adjustment. To set the level of the subwoofer, use the OUTPUT LEVEL control. Because our ears are less sensitive to very low bass sounds, there's a temptation to set the level of the subwoofer too high. As a rule of thumb, set the subwoofer level to what you think is the optimal level, and then back it off slightly. Select a suitable listening mode and enjoy! See "Using the Listening Modes" on page 46.
-
 1
1 -
2
-
3
-
4
-
5
-
6
-
7
-
8
-
9
-
10
-
11
-
12
-
13
-
14
-
15
-
16
-
17
-
18
-
19
-
20
-
21
-
22
-
23
-
24
-
25
-
26
-
27
-
28
-
29
-
30
-
 31
31 -
 32
32 -
 33
33 -
 34
34 -
 35
35 -
 36
36 -
 37
37 -
 38
38 -
 39
39 -
 40
40 -
 41
41 -
42
-
43
-
44
-
45
-
46
-
47
-
48
-
49
-
50
-
51
-
52
-
53
-
54
-
55
-
56
-
57
-
58
-
59
-
60
-
61
-
62
-
63
-
64
-
65
-
66
-
67
-
68
-
69
-
70
-
71
-
72
-
73
-
74
-
75
-
76
-
77
-
78
-
79
-
80
 |
 |
