Onkyo HT-R667 Owner Manual - Page 23
Center Speaker Base, Using the Floor Pads for Subwoofer, Wall Mounting - no sound
 |
View all Onkyo HT-R667 manuals
Add to My Manuals
Save this manual to your list of manuals |
Page 23 highlights
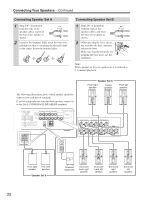
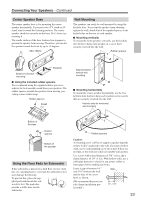
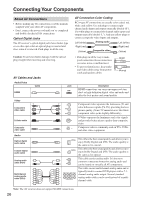
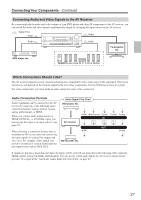
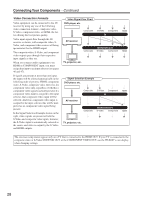
Connecting Your Speakers-Continued Center Speaker Base The center speaker base is for mounting the center speaker horizontally. If you put it on a TV stand or AV stand, aim it toward the listening position. The center speaker should sit securely on the base. If it's loose, try resetting it. The cradle surface of the base features two stoppers to prevent the speaker from moving. Therefore, you can tilt the speaker toward the front by up to 11 degrees. SKC-750XC 11 Wall Mounting The speakers can easily be wall mounted by using the keyhole slots. To prevent the speaker from vibrating against the wall, attach four of the supplied spacers to the keyhole fins on the rear of each speaker. ■ Mounting vertically To mount the front speakers vertically, use the keyhole slot shown to hang each speaker on a screw that's securely screwed into the wall. Rubber spacers Stoppers Base for horizontal mounting ■ Using the included rubber spacers We recommend using the supplied rubber spacers to achieve the best possible sound from your speakers. The rubber spacers prevent the speakers from moving, providing a more stable setup. Rubber spacers Front Keyhole slot for vertical wall mounting ■ Mounting horizontally To mount the center speaker horizontally, use the two keyhole slots shown to hang each speaker on two screws that are securely screwed into the wall. Keyhole slots for horizontal wall mounting Bottom of the base Rubber spacers Bottom of the speaker Using the Floor Pads for Subwoofer If the subwoofer is placed on a hard floor (wood, vinyl, tile, etc.) and playback is very loud, the subwoofer's feet may damage the flooring. To prevent this, place the supplied pads underneath the subwoofer's feet. The pads also provide a stable base for the subwoofer. Rubber spacers Caution: A mounting screw's ability to support a speaker depends on how well it's anchored to the wall. If you have hollow walls, screw each mounting screw into a stud. If there are no studs, or the walls are solid, use suitable wall anchors. Use screws with a head diameter of 3/8" or less and a shank diameter of 1/8" or less. With hollow walls, use a cable/pipe detector to check for any power cables or water pipes before making any holes. Leave a gap of between 1/4" Wall and 5/16" between the wall and the base of the screw head, as shown. (We recommend that you consult a home installation professional.) 1/4" - 5/16" 23
-
 1
1 -
2
-
3
-
4
-
5
-
6
-
7
-
8
-
9
-
10
-
11
-
12
-
13
-
14
-
15
-
16
-
17
-
 18
18 -
 19
19 -
 20
20 -
 21
21 -
 22
22 -
 23
23 -
 24
24 -
 25
25 -
 26
26 -
 27
27 -
 28
28 -
29
-
30
-
31
-
32
-
33
-
34
-
35
-
36
-
37
-
38
-
39
-
40
-
41
-
42
-
43
-
44
-
45
-
46
-
47
-
48
-
49
-
50
-
51
-
52
-
53
-
54
-
55
-
56
-
57
-
58
-
59
-
60
-
61
-
62
-
63
-
64
-
65
-
66
-
67
-
68
-
69
-
70
-
71
-
72
-
73
-
74
-
75
-
76
-
77
-
78
-
79
-
80
-
81
-
82
-
83
-
84
-
85
-
86
-
87
-
88
-
89
-
90
-
91
-
92
-
93
-
94
-
95
-
96
-
97
-
98
-
99
-
100
 |
 |
