Onkyo HT-R667 Owner Manual - Page 43
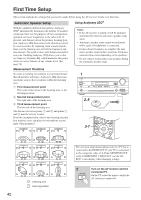
SETUP MIC jack., Press [ENTER].
 |
View all Onkyo HT-R667 manuals
Add to My Manuals
Save this manual to your list of manuals |
Page 43 highlights
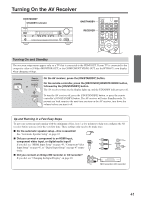
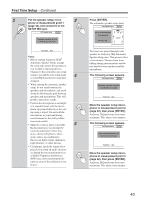
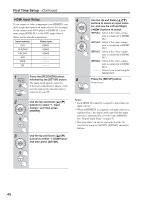
First Time Setup-Continued 2 Put the speaker setup micro- 3 phone at measurement point 1 SETUP MIC (page 42), and connect it to the SETUP MIC jack. Auto Speaker Setup AUDYSSEY Please place microphone at center of listening area at ear height. Push Enter : Next Notes: • Before starting Audyssey 2EQ® Automatic Speaker Setup, arrange the room and connect the speakers as you would for enjoying movies. Changes to the room after auto setup requires you run the auto setup again, 4 as room EQ characteristics may have changed. • When starting the automatic speaker setup, do not stand between the speakers and microphone, and avoid obstacles blocking the path between speakers and microphone. This will produce inaccurate results. • Position the microphone at ear height of a seated listener with the micro- phone tip pointed directly at the ceil- ing using a tripod. Do not hold the microphone in your hand during measurements as this will produce inaccurate results. • Make the room as quiet as possible. 5 Background noise can disrupt the room measurements. Close windows, silence cell phones, televi- sions, radios, air conditioners, fluorescent lights, home appliances, light dimmers, or other devices. • Cell phones should be turned off or placed away from all audio electronics during the measurement process as Radio Frequency Interference (RFI) may cause measurement dis- ruptions (even if the cell phone is not in use). Press [ENTER]. The automatic speaker setup starts. Auto Speaker Setup AUDYSSEY Do not unplug microphone. Please keep quiet. Now Measuring. . . Test tones are played through each speaker as Audyssey 2EQ Automatic Speaker Setup runs. This process takes a few minutes. Please refrain from talking during measurements and do not stand between speakers and the microphone. The following screen appears. Auto Speaker Setup AUDYSSEY Please place microphone at right end of listening area at ear height. Push Enter : Next Move the speaker setup microphone to measurement point 2 (page 42), then press [ENTER]. Audyssey 2EQ performs more measurements. This takes a few minutes. The following screen appears. Auto Speaker Setup AUDYSSEY Please place microphone at left end of listening area at ear height. Push Enter : Next Move the speaker setup microphone to measurement point 3 (page 42), then press [ENTER]. Audyssey 2EQ performs more measurements. This takes a few minutes. 43
-
 1
1 -
2
-
3
-
4
-
5
-
6
-
7
-
8
-
9
-
10
-
11
-
12
-
13
-
14
-
15
-
16
-
17
-
18
-
19
-
20
-
21
-
22
-
23
-
24
-
25
-
26
-
27
-
28
-
29
-
30
-
31
-
32
-
33
-
34
-
35
-
36
-
37
-
 38
38 -
 39
39 -
 40
40 -
 41
41 -
 42
42 -
 43
43 -
 44
44 -
 45
45 -
 46
46 -
 47
47 -
 48
48 -
49
-
50
-
51
-
52
-
53
-
54
-
55
-
56
-
57
-
58
-
59
-
60
-
61
-
62
-
63
-
64
-
65
-
66
-
67
-
68
-
69
-
70
-
71
-
72
-
73
-
74
-
75
-
76
-
77
-
78
-
79
-
80
-
81
-
82
-
83
-
84
-
85
-
86
-
87
-
88
-
89
-
90
-
91
-
92
-
93
-
94
-
95
-
96
-
97
-
98
-
99
-
100
 |
 |
