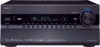
Onkyo TX-NR3007 Owner Manual - Page 59
TV Format Setup (European and Asian models), FM/AM Frequency Step Setup - firmware update
 |
View all Onkyo TX-NR3007 manuals
Add to My Manuals
Save this manual to your list of manuals |
Page 59 highlights
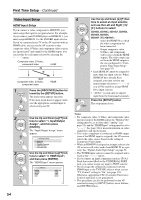
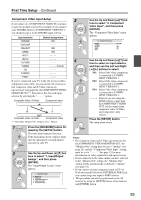
First Time Setup-Continued TV Format Setup (European and Asian models) For the onscreen setup menus to display properly, you must specify the TV system used in your area. 1 Press the [RECEIVER] button fol- lowed by the [SETUP] button. The main menu appears onscreen. If the main menu doesn't appear, make sure the appropriate external input is selected on your TV. 2 Use the Up and Down [R]/[X] but- tons to select "6. Miscella- neous", and then press [ENTER]. The "Miscellaneous" menu appears. 6. Miscellaneous 1. Volume Setup 2. OSD Setup 5 When you've finished, press the [SETUP] button. The setup menu closes. Note: This procedure can also be performed on the AV receiver by using its [SETUP] button, arrow buttons, and [ENTER] button. FM/AM Frequency Step Setup For FM/AM tuning to work properly, you must specify the FM/AM frequency step used in your area. Note that when this setting is changed, all radio presets are deleted. 1 Press the [RECEIVER] button, followed by the [SETUP] button. The main menu appears onscreen. If the main menu doesn't appear, make sure the appropriate external input is selected on your TV. 3 Use the Up and Down [R]/[X] buttons to select "2. OSD Setup", 2 Use the Up and Down [R]/[X] buttons to select "7. Hardware and then press [ENTER]. Setup", and then press [ENTER]. The "OSD Setup" menu appears. The "Hardware Setup" menu appears. 6-2. OSD Setup Immediate Display Display Position TV Format Language On Bottom Auto English 7. Hardware Setup 1. Remote ID 2. Multi Zone 3. Tuner 4. HDMI 5. Network 6. Firmware Update 4 Use the Up and Down [R]/[X] but- tons to select "TV Format", and then use the Left and Right [F]/[S] buttons to select: Auto: Select this to automatically detect the TV system from the video input signals. NTSC: Select if the TV system in your area is NTSC. PAL: Select if the TV system in your area is PAL. 59
-
 1
1 -
2
-
3
-
4
-
5
-
6
-
7
-
8
-
9
-
10
-
11
-
12
-
13
-
14
-
15
-
16
-
17
-
18
-
19
-
20
-
21
-
22
-
23
-
24
-
25
-
26
-
27
-
28
-
29
-
30
-
31
-
32
-
33
-
34
-
35
-
36
-
37
-
38
-
39
-
40
-
41
-
42
-
43
-
44
-
45
-
46
-
47
-
48
-
49
-
50
-
51
-
52
-
53
-
 54
54 -
 55
55 -
 56
56 -
 57
57 -
 58
58 -
 59
59 -
 60
60 -
 61
61 -
 62
62 -
 63
63 -
 64
64 -
65
-
66
-
67
-
68
-
69
-
70
-
71
-
72
-
73
-
74
-
75
-
76
-
77
-
78
-
79
-
80
-
81
-
82
-
83
-
84
-
85
-
86
-
87
-
88
-
89
-
90
-
91
-
92
-
93
-
94
-
95
-
96
-
97
-
98
-
99
-
100
-
101
-
102
-
103
-
104
-
105
-
106
-
107
-
108
-
109
-
110
-
111
-
112
-
113
-
114
-
115
-
116
-
117
-
118
-
119
-
120
-
121
-
122
-
123
-
124
-
125
-
126
-
127
-
128
-
129
-
130
-
131
-
132
-
133
-
134
-
135
-
136
-
137
-
138
-
139
-
140
-
141
-
142
-
143
-
144
-
145
-
146
-
147
-
148
-
149
-
150
-
151
-
152
-
153
-
154
-
155
-
156
-
157
-
158
-
159
-
160
-
161
-
162
-
163
-
164
 |
 |
