Onkyo TX-NR708 Owner Manual - Page 42
Advanced Operations, Advanced Setup, On-screen Setup Menus, Common Procedures in Setup Menu - firmware updates
 |
View all Onkyo TX-NR708 manuals
Add to My Manuals
Save this manual to your list of manuals |
Page 42 highlights
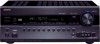
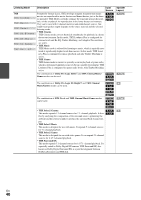
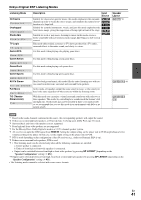
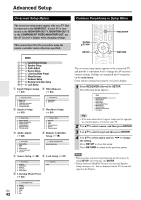
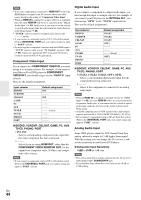
Advanced Operations Advanced Setup On-screen Setup Menus Common Procedures in Setup Menu The on-screen setup menus appear only on a TV that is connected to the HDMI OUT. If your TV is connected to the MONITOR OUT V, MONITOR OUT S or the COMPONENT VIDEO MONITOR OUT, use the AV receiver's display when changing settings. This manual describes the procedure using the remote controller unless otherwise specified. MENU B 1. Input/Output Assign C 2. Speaker Setup D 3. Audio Adjust E 4. Source Setup F 5. Listening Mode Preset G 6. Miscellaneous H 7. Hardware Setup I 8. Remote Controller Setup J 9. Lock Setup B Input/Output Assign G Miscellaneous (➔ 43) (➔ 54) 1. Input/Output Assign 1. Monitor Out 2. HDMI Input 3. Component Video Input 4. Digital Audio Input 5. Analog Audio Input C Speaker Setup (➔ 45) 6. Miscellaneous 1. Volume Setup 2. OSD Setup H Hardware Setup (➔ 54) 2. Speaker Setup 1. Speaker Settings 2. Speaker Configuration 3. Speaker Distance 4. Level Calibration 5. Equalizer Settings 6. THX Audio Setup D Audio Adjust (➔ 48) 7. Hardware Setup 1. Remote ID 2. Tuner 3. HDMI 4. Auto Power Down 5. Network 6. Firmware Update I Remote Controller Setup (➔ 78) 3. Audio Adjust 1. Multiplex/Mono 2. Dolby 3. DTS 4. Audyssey DSX 5. Theater-Dimensional 6. LFE Level 8. Remote Controller Setup Remote Mode Setup E Source Setup (➔ 49) J Lock Setup (➔ 57) 4. Source Setup 1. Audyssey 2. IntelliVolume 3. A/V Sync 4. Name Edit 5. Picture Adjust F Listening Mode Preset (➔ 53) 9. Lock Setup Setup En 42 5. Listening Mode Preset 1. BD/DVD 2. VCR/DVR 3. CBL/SAT 4. GAME 5. PC 6. AUX ENTER R/X/F/S SETUP RECEIVER RETURN The on-screen setup menus appear on the connected TV and provide a convenient way to change the AV receiver's various settings. Settings are organized into 9 categories on the main menu. Carry out the settings by using the on-screen display. 1 Press RECEIVER followed by SETUP. The following menu appears. MENU 1. Input/Output Assign 2. Speaker Setup 3. Audio Adjust 4. Source Setup 5. Listening Mode Preset 6. Miscellaneous 7. Hardware Setup 8. Remote Controller Setup 9. Lock Setup Tip • If the main menu doesn't appear, make sure the appropriate external input is selected on your TV. 2 Use R/X to select a menu, and then press ENTER. 3 Use R/X to select target and then press ENTER. 4 Use R/X to select option and use F/S to change the setting. Press SETUP to close the menu. Press RETURN to return to the previous menu. Note • This procedure can also be performed on the AV receiver by using SETUP, arrow buttons, and ENTER. • During Audyssey MultEQ® Room Correction and Speaker Setup, messages, etc., that are displayed on the TV screen will appear in the Display.
-
 1
1 -
2
-
3
-
4
-
5
-
6
-
7
-
8
-
9
-
10
-
11
-
12
-
13
-
14
-
15
-
16
-
17
-
18
-
19
-
20
-
21
-
22
-
23
-
24
-
25
-
26
-
27
-
28
-
29
-
30
-
31
-
32
-
33
-
34
-
35
-
36
-
 37
37 -
 38
38 -
 39
39 -
 40
40 -
 41
41 -
 42
42 -
 43
43 -
 44
44 -
 45
45 -
 46
46 -
 47
47 -
48
-
49
-
50
-
51
-
52
-
53
-
54
-
55
-
56
-
57
-
58
-
59
-
60
-
61
-
62
-
63
-
64
-
65
-
66
-
67
-
68
-
69
-
70
-
71
-
72
-
73
-
74
-
75
-
76
-
77
-
78
-
79
-
80
-
81
-
82
-
83
-
84
-
85
-
86
-
87
-
88
-
89
-
90
-
91
-
92
-
93
-
94
-
95
-
96
 |
 |