Onkyo TX SR674 Owner Manual - Page 67
Advanced Setup
 |
UPC - 751398007118
View all Onkyo TX SR674 manuals
Add to My Manuals
Save this manual to your list of manuals |
Page 67 highlights
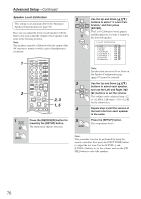
Advanced Setup Speaker Setup 2 Some of the settings in this section are set automatically by the Automatic Speaker Setup function (see page 38). Here you can check the settings made by the Automatic Speaker Setup function, or set them manually, which is useful if you change one of the connected speakers after using the Automatic Speaker Setup function. Speaker Configuration This setting is set automatically by the Automatic Speaker Setup function (see page 38). With these settings, you can specify which speakers are connected and a crossover frequency for each speaker. 3 The following crossover frequencies can be specified: Full Band, 40 Hz, 50 Hz, 60 Hz, 80 Hz, 100 Hz, 120 Hz, 150 Hz, 200 Hz. Specify Full Band for speakers that can output low-fre- quency bass sounds adequately, for example, speakers with a good sized woofer. For smaller speakers, specify a crossover frequency. Sounds below the crossover fre- quency will be output by the subwoofer instead of the speaker. Refer to your speakers' manuals to determine 4 the optimum crossover frequencies. 1 2 ON/STANDBY ZONE2 REMOTE MODE RECEIVER TAPE INPUT SELECTOR 1 2 3 V1 V2 V3 DVD M D/CDR C D HDD 4 5 6 TV V4 MULTI CH DVD 7 8 9 VCR TAPE TUNER 10 11 +10 0 C D 12 CABLE CLR SAT D TUN --/--- ENT DIMMER SLEEP TV VOL INPUT GUIDE TOP MENU CH DISC ALBUM VOL PREVIOUS MENU PLAYLIST/CAT ENTER MUTING PLAYLIST/CAT RETURN SETUP 2-10 1, 11 5 Use the Up and Down [ ]/[ ] buttons to select "1. Speaker Config," and then press [ENTER]. The Speaker Config menu appears. 1.Speaker Config a.Subwoofer :Yes b.Front : 100Hz c.Center : 100Hz d.Surround : 100Hz e.SurrBack : 100Hz f.SurrBack Ch :2ch g.LPFofLFE : 120Hz h.DoubleBass :--- Use the Up and Down [ ]/[ ] buttons to select "a. Subwoofer," and then use the Left and Right [ ]/[ ] buttons to select: Yes: Select if a subwoofer is connected. No: Select if no subwoofer is connected. Use the Up and Down [ ]/[ ] buttons to select "b. Front," and then use the Left and Right [ ]/ [ ] buttons to select a crossover frequency. Note: If the Subwoofer setting in step 3 is set to No, this setting is fixed at Full Band. Use the Up and Down [ ]/[ ] buttons to select "c. Center," and then use the Left and Right [ ]/ [ ] buttons to select a crossover frequency. If no center speaker is connected, select None. Note: If the Front setting in step 4 is set to anything other than Full Band, Full Band cannot be selected here. 1 RECEIVER Press the [RECEIVER] button followed by the [SETUP] button. The main menu appears onscreen. SETUP 67
-
 1
1 -
2
-
3
-
4
-
5
-
6
-
7
-
8
-
9
-
10
-
11
-
12
-
13
-
14
-
15
-
16
-
17
-
18
-
19
-
20
-
21
-
22
-
23
-
24
-
25
-
26
-
27
-
28
-
29
-
30
-
31
-
32
-
33
-
34
-
35
-
36
-
37
-
38
-
39
-
40
-
41
-
42
-
43
-
44
-
45
-
46
-
47
-
48
-
49
-
50
-
51
-
52
-
53
-
54
-
55
-
56
-
57
-
58
-
59
-
60
-
61
-
 62
62 -
 63
63 -
 64
64 -
 65
65 -
 66
66 -
 67
67 -
 68
68 -
 69
69 -
 70
70 -
 71
71 -
 72
72 -
73
-
74
-
75
-
76
-
77
-
78
-
79
-
80
-
81
-
82
-
83
-
84
-
85
-
86
-
87
-
88
-
89
-
90
-
91
-
92
 |
 |
