Optoma ZU720TST ZU720T User Manual - Page 15
Press PIP/PBP to launch PIP/PBP menu., Press Focus
 |
View all Optoma ZU720TST manuals
Add to My Manuals
Save this manual to your list of manuals |
Page 15 highlights
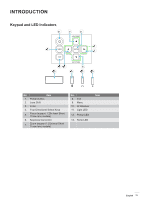
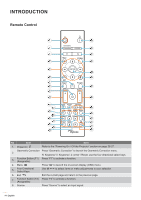
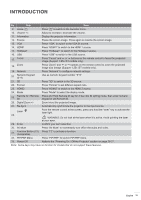
INTRODUCTION No Item Item 9. Home Press " " to switch to the launcher home. 10. Volume +/- Adjust to increase / decrease the volume. 11. Information Display the projector information. 12. Freeze Pause the screen image. Press again to resume the screen image. 13. VGA Press "VGA" to switch to the VGA IN source. 14. HDMI1 Press "HDMI1" to switch to the HDMI 1 source. 15. HDBaseT Press "HDBaseT" to switch to the HDBaseT source. 16. USB Press "USB" to switch to the USB source. 17. Focus Press "Focus" and or buttons on the remote control to focus the projected image (Support 1.25x /ST models only). 18. Zoom Press "Zoom" and or buttons on the remote control to zoom the projected image size (image (Support 1.25x /ST models only). 19. Network Press "Network" to configure network settings. 20. Numeric Keypad (0~9) Use as numeric keypad number "0~9". 21. 3D Press "3D" to switch to the 3D source. 22. Format Press "Format" to set different aspect ratio. 23. HDMI2 Press "HDMI2" to switch to the HDMI 2 source. 24. Mode Press "Mode" to select the display mode. 25. Remote ID / Remote All Press and Hold Remote ID key for 3 Sec into ID setting mode, than enter numeric keypad to set Remote ID. 26. Digital Zoom +/- Zoom in/out the projected image. 27. Re-Sync Automatically synchronize the projector to the input source. Laser 28. Point the remote control at the screen, press and hold the "laser" key to activate the laser light. WARNING: Do not look at the laser when it is active. Avoid pointing the laser at your eyes. 29. Enter Confirm your item selection. 30. AV Mute Press "AV Mute" to momentarily turn off/on the audio and video. 31. Function Button (F2) (Assignable) Press "F2" to activate a function. 32. PIP/PBP Menu Press "PIP/PBP" to launch PIP/PBP menu. 33. Power Off Refer to the "Powering On / Off the Projector" section on page 25-27. Note: Some keys may have no function for models that do not support these features. English 15
-
 1
1 -
2
-
3
-
4
-
5
-
6
-
7
-
8
-
9
-
 10
10 -
 11
11 -
 12
12 -
 13
13 -
 14
14 -
 15
15 -
 16
16 -
 17
17 -
 18
18 -
 19
19 -
 20
20 -
21
-
22
-
23
-
24
-
25
-
26
-
27
-
28
-
29
-
30
-
31
-
32
-
33
-
34
-
35
-
36
-
37
-
38
-
39
-
40
-
41
-
42
-
43
-
44
-
45
-
46
-
47
-
48
-
49
-
50
-
51
-
52
-
53
-
54
-
55
-
56
-
57
-
58
-
59
-
60
-
61
-
62
-
63
-
64
-
65
-
66
-
67
-
68
-
69
-
70
-
71
-
72
-
73
-
74
-
75
-
76
 |
 |
