Optoma ZU720TST ZU720T User Manual - Page 52
Personalize menu, Network menu, Network Status, IP Address, Proxy Settings, IP Settings, Reset
 |
View all Optoma ZU720TST manuals
Add to My Manuals
Save this manual to your list of manuals |
Page 52 highlights
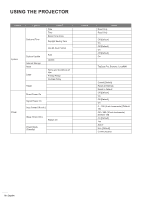
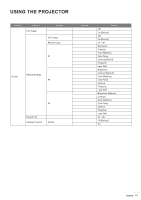
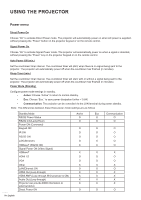
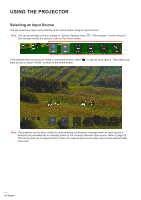
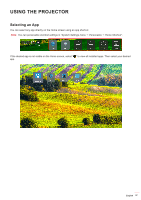
USING THE PROJECTOR Personalize menu Wallpaper Allow you to change the launcher home wallpaper. Note: Adding custom wallpapers is not supported. Home Shortcut Review Home screen shortcuts of all opened apps in each input source. The items cannot repeat except for "Automatic" option which means the system will remember up to six latest apps that have been opened and then will replace app shortcuts so that the latest app will be the first app in the apps list while other apps in the list are shifted by one position. Auto Source Choose this option to let the projector automatically find an available input source. Input Name Use to rename the input function for easier identification. The available options include HDMI 1, HDMI 2, VGA, HDBaseT, USB, and Home. Network menu Ethernet Configure wired network settings. Note: ‡‡ ‡‡ Make sure you have connected the projector to local area network (LAN). When using Tapcast Pro, Browser, System update (FOTA), and Date and Time functions, make sure that Ethernet is connected. ‡‡ Network Status: Display the network connection status (read-only). ‡‡ IP Address: Display the IP address (read-only). ‡‡ Mac Address: Display the MAC address (read-only). ‡‡ Proxy Settings: Provide proxy hostname, connection port and bypass proxy domains information manually if requested. ‡‡ IP Settings: Enable DHCP if you want the projector to obtain IP address and other connection parameters automatically from your network. Disable DHCP if you want to assign IP address, gateway, network prefix length, and DNS parameters manually. ‡‡ Reset: Return the factory default settings for network settings. LAN Control Configure the local area network (LAN) settings. Note: Before using ProService Local, Crestron, Extron, PJLink, Tenlet and Web management, please make sure you are connected to the LAN and set Password by Web browser. ‡‡ Network Status: Display the network connection status (read-only). ‡‡ Mac Address: Display the MAC address (read-only). ‡‡ DHCP: Use this option to enable and disable the DHCP function. ¾¾ Off: To assign IP, subnet mask, gateway, and DNS configuration manually. ¾¾ On: Projector will obtain an IP address automatically from your network. 52 English
-
 1
1 -
2
-
3
-
4
-
5
-
6
-
7
-
8
-
9
-
10
-
11
-
12
-
13
-
14
-
15
-
16
-
17
-
18
-
19
-
20
-
21
-
22
-
23
-
24
-
25
-
26
-
27
-
28
-
29
-
30
-
31
-
32
-
33
-
34
-
35
-
36
-
37
-
38
-
39
-
40
-
41
-
42
-
43
-
44
-
45
-
46
-
 47
47 -
 48
48 -
 49
49 -
 50
50 -
 51
51 -
 52
52 -
 53
53 -
 54
54 -
 55
55 -
 56
56 -
 57
57 -
58
-
59
-
60
-
61
-
62
-
63
-
64
-
65
-
66
-
67
-
68
-
69
-
70
-
71
-
72
-
73
-
74
-
75
-
76
 |
 |