Palsonic TFTV4355M Owners Manual - Page 22
GREEN, Auto Timeshift, Recorder Start
 |
View all Palsonic TFTV4355M manuals
Add to My Manuals
Save this manual to your list of manuals |
Page 22 highlights
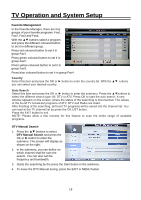
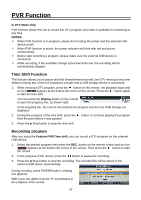
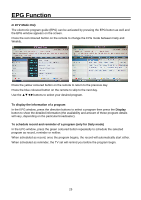
TV Operation and System Setup Partition Select Select a disk to store the recorded file. Press the ▲▼ button to select Partition Select and press the OK button to prompt a sub-menu. Press RED button to enter a dialog box and then select OK to format your USB memory device. Press GREEN button to set default partition. The available item varies depending on the external USB device connected to the unit. NOTES: We cannot guarantee compatibility (operation and/or bus power) with all USB mass storage devices and assumes no responsibility for any loss of data that may occur when connected to this unit. With large amounts of data, it may take longer for the system to read the contents of a USB device. Unit may require longer time to format depending on the volume of the USB device. Some USB devices may not be properly recognized. Even when they are in a supported format, some files may not play or display depending on the content. Please make sure the USB device's file system is FAT32, NTFS. USB device must be a high speed USB2.0 in order to operate properly. Auto Timeshift Press the ‚ button to select Auto Timeshift. Press the OK or „ button to enter the submenu. With the ‚ buttons to select Off or On. Timeshift Buffer Press the ▲▼ button to select Timeshift Buffer and press OK; then use the direction buttons to select the desired setting. Timer Press the ▲▼ button to select Timer and press OK, all the scheduled timer will be listed. In the timer list, you can: Use the red coloured button to delete a timer. Use the green coloured button to delete all the timers. Use the yellow coloured button to add a new timer. Use the blue coloured button to edit a timer. Record List Press the ▲▼ button to select Record List and press OK, all the record will be listed. In the record list, press the red coloured button to delete the selected file. Press the OK button to play the record. Recorder Start This item is used to start recording when watching an available digital program. Note: Before recording, insert you USB memory device into USB slot first. 21
-
 1
1 -
2
-
3
-
4
-
5
-
6
-
7
-
8
-
9
-
10
-
11
-
12
-
13
-
14
-
15
-
16
-
 17
17 -
 18
18 -
 19
19 -
 20
20 -
 21
21 -
 22
22 -
 23
23 -
 24
24 -
 25
25 -
 26
26 -
 27
27 -
28
-
29
-
30
-
31
-
32
-
33
-
34
-
35
-
36
-
37
-
38
 |
 |