Panasonic CF-29ETPGZKM Notebook Computer - Page 37
Backing Up and Restoring Data
 |
UPC - 092281837628
View all Panasonic CF-29ETPGZKM manuals
Add to My Manuals
Save this manual to your list of manuals |
Page 37 highlights
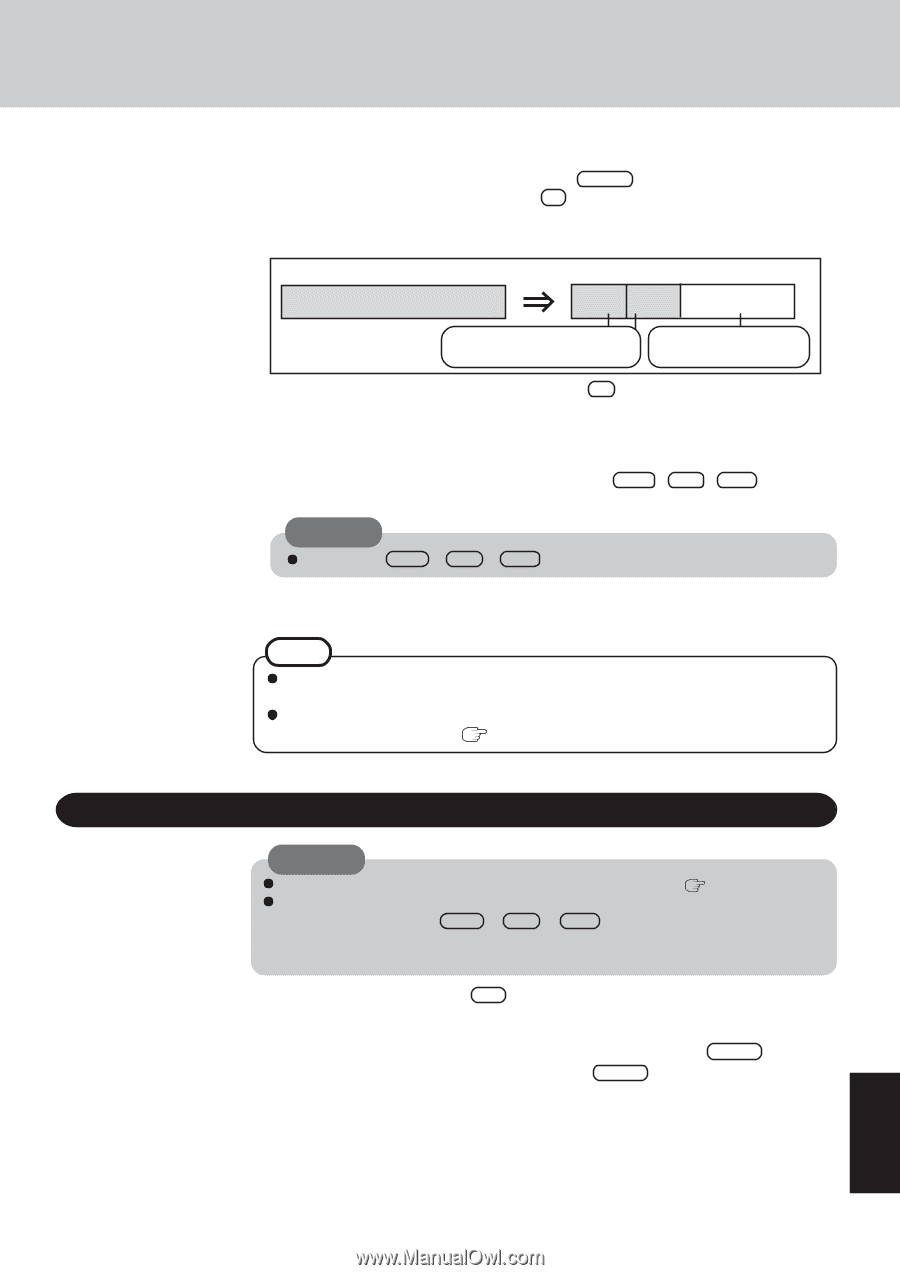
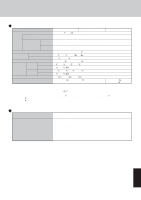
Select [2], enter the partition size (GB), and press Enter . • You can cancel this operation by pressing 0 . • The data partition size will be the maximum settable size less the number entered above. The maximum settable size will differ depending on models. [At the time of purchase] The usable hard disk area [After the backup area is created] The backup area Can be accessed from Cannot be accessed Windows (Two partitions). from Windows. 9 When the confirmation message is displayed, press Y . The backup area is then created. 10 When the message [You must reboot in order to enable the Backup function] appears, remove the recovery CD, and press any key to restart the computer. The computer is restarted, then the backup process will begin. 11 When the message [[Backup] is complete] appears, press Ctrl + Alt + Del to restart the computer. CAUTION Do not press Ctrl + Alt + Del until the message is displayed. 12 A message will appear advising that a new device has been installed and that the computer must be restarted to enable the settings. Select [Yes] to restart the computer. NOTE The [Boot] menu in the Setup Utility is set to start up from the CD/DVD drive. Change this setting if necessary. The next time the backup or restore functions are executed, follow the procedure for [Backing Up and Restoring Data] ( below). Backing Up and Restoring Data CAUTION Before executing the backup function, execute a disk error check ( page 35). Do not interrupt the backup or restore functions before completion, for example by turning off the power or pressing Ctrl + Alt + Del , as this may prevent Windows from starting up, or may cause data to be lost so that the backup and restore functions cannot be executed. 1 Turn the computer on, and press F2 while [Panasonic] boot screen is displayed. The Setup Utility will start up. If a password has been set, enter the Supervisor Password or the User Password. 2 Select [Exit] menu, then select [Hard Disk Backup / Restore] and press çEnter . At the confirmation message, select [Yes] and press çEnter . Appendix 37
-
 1
1 -
2
-
3
-
4
-
5
-
6
-
7
-
8
-
9
-
10
-
11
-
12
-
13
-
14
-
15
-
16
-
17
-
18
-
19
-
20
-
21
-
22
-
23
-
24
-
25
-
26
-
27
-
28
-
29
-
30
-
31
-
 32
32 -
 33
33 -
 34
34 -
 35
35 -
 36
36 -
 37
37 -
 38
38 -
 39
39 -
 40
40 -
 41
41 -
 42
42 -
43
-
44
 |
 |