Panasonic CF-29ETPGZKM Notebook Computer - Page 38
Appendix
 |
UPC - 092281837628
View all Panasonic CF-29ETPGZKM manuals
Add to My Manuals
Save this manual to your list of manuals |
Page 38 highlights
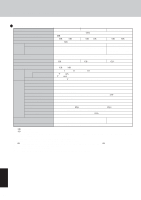
Hard Disk Backup Function 3 Select the operation to be executed from the menu. 1 Press 1 to execute [1. [Backup]]. (When dividing the hard disk into two partitions, select the backup method at next screen.) 2 At the confirmation message, press Y . The backup process will begin. 1 Press 2 to execute [2. [Restore]]. (When data is backed up in two partitions, select the restore method at next screen.) 2 At the confirmation message, press Y . The restore process will begin. NOTE The time required to complete the backup or restore process differs depending on the data volume. 4 When the message [[Backup] is complete] or [[Restore] is complete] is displayed, press Ctrl + Alt + Del to restart the computer. • If the backup or restore process was interrupted before completion, for example if the power was turned off, execute the process again. • When a new device is installed and a message appears advising that the computer must be restarted to enable the settings, select [Yes] to restart the computer. CAUTION When the hard disk backup function has been enabled, even if a commercial data erasing utility or similar software is used to erase all data from user-accessible area, the backed up data will not be erased. You can use the hard disk data erase utility included in this computer ( page 39) to erase all data on the hard disk, including backed up data. Use this hard disk data erase utility before disposing of or transferring ownership of this computer. Occasionally, the message [#1805 cannot write image file] will be displayed, and the backup function will be interrupted. If this error occurs, execute the backup function again. After this, if the backup function is completed properly, then there is no problem in the hard disk. To disable the hard disk backup function Perform the reinstallation procedure. All data in the backup area and the hard disk will be erased. Conduct steps 1-8 for [Reinstalling Software] ( page 31). Select [1] or [2] to execute the reinstallation at the screen for executing the reinstallation. • When [1] is selected, the hard disk backup function can be disabled. • When [2] is selected, the hard disk backup function can be disabled, but in this case, because the hard disk has been divided into partitions, the hard disk backup function cannot be re-enabled ( page 24). • When [3] is selected, the hard disk backup function cannot be disabled. 38 Appendix
-
 1
1 -
2
-
3
-
4
-
5
-
6
-
7
-
8
-
9
-
10
-
11
-
12
-
13
-
14
-
15
-
16
-
17
-
18
-
19
-
20
-
21
-
22
-
23
-
24
-
25
-
26
-
27
-
28
-
29
-
30
-
31
-
32
-
 33
33 -
 34
34 -
 35
35 -
 36
36 -
 37
37 -
 38
38 -
 39
39 -
 40
40 -
 41
41 -
 42
42 -
 43
43 -
44
 |
 |
