Panasonic CT32SC13G Service Manual - Page 33
Disassembly for CRT replacement
 |
View all Panasonic CT32SC13G manuals
Add to My Manuals
Save this manual to your list of manuals |
Page 33 highlights
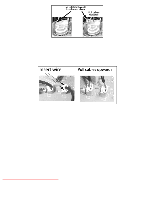
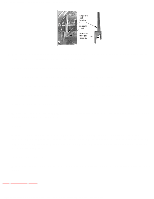
http://tsn.pstc.panasonic.com/viewing/NA/CT-36SL13G/SVC/s1001000000.html 10.1 Disassembly for CRT replacement TOP PREVIOUS NEXT 1. Discharge the CRT as instructed in the "safety precautions" section and remove 2nd anode button from the CRT. 2. Remove speaker modules (R and L) 3. Perform complete removal of chassis, as instructed in "disassembly for service" section. NOTE When remounting the CRT, reuse the metal sheet located in the lower part of the cabinet holding the CRT, hold with screws to the cabinet. This metal sheet is not supplied with the CRT replacement. CRT replacement 1. Perform "disassembly for CRT replacement" procedure. 2. Insure that the CRT H.V. Anode button is discharged before handling the CRT. Read the "safety precautions" section on handling the picture tube. 3. Remove the components from the CRT neck and place the cabinet face down on a soft pad. 4. Note the original order for the CRT mounting hardware as they are remove from the CRT mounting brackets at each corner of the CRT. 5. Remove the CRT with the degaussing coil and the dag ground braid attached. NOTE To remove the four brackets holding the degauss coil from the corners of the CRT, first remove the CRT from the cabinet, then remove the brackets by pressing the tab on the bracket and pull upwards. These brackets are included in the degauss coilkit, for part number, please see parts list section Brackets removal http://tsn.pstc.panasonic.com/viewing/NA/CT-36SL13G/SVC/s1001000000.html (1 of 2)05.12.2008 0:01:40
-
 1
1 -
2
-
3
-
4
-
5
-
6
-
7
-
8
-
9
-
10
-
11
-
12
-
13
-
14
-
15
-
16
-
17
-
18
-
19
-
20
-
21
-
22
-
23
-
24
-
25
-
26
-
27
-
 28
28 -
 29
29 -
 30
30 -
 31
31 -
 32
32 -
 33
33 -
 34
34 -
 35
35 -
 36
36 -
 37
37 -
 38
38 -
39
-
40
-
41
-
42
-
43
-
44
-
45
-
46
-
47
-
48
-
49
-
50
-
51
-
52
-
53
-
54
-
55
-
56
-
57
-
58
-
59
-
60
-
61
-
62
-
63
-
64
-
65
-
66
-
67
-
68
-
69
-
70
-
71
-
72
-
73
-
74
-
75
-
76
-
77
-
78
-
79
-
80
-
81
-
82
-
83
-
84
-
85
-
86
-
87
-
88
-
89
-
90
-
91
-
92
-
93
-
94
-
95
-
96
-
97
-
98
-
99
-
100
-
101
-
102
-
103
-
104
-
105
-
106
-
107
-
108
-
109
-
110
-
111
-
112
-
113
-
114
-
115
-
116
-
117
-
118
-
119
-
120
-
121
-
122
-
123
-
124
-
125
-
126
-
127
-
128
-
129
-
130
-
131
-
132
-
133
-
134
-
135
-
136
-
137
-
138
-
139
-
140
-
141
-
142
-
143
-
144
-
145
-
146
-
147
-
148
-
149
-
150
-
151
-
152
-
153
-
154
-
155
-
156
-
157
-
158
-
159
-
160
-
161
-
162
-
163
-
164
-
165
-
166
-
167
-
168
-
169
-
170
-
171
-
172
-
173
-
174
-
175
-
176
-
177
-
178
-
179
-
180
-
181
-
182
-
183
-
184
-
185
-
186
-
187
 |
 |
