Panasonic CT32SC13G Service Manual - Page 41
Purity Adjustment
 |
View all Panasonic CT32SC13G manuals
Add to My Manuals
Save this manual to your list of manuals |
Page 41 highlights
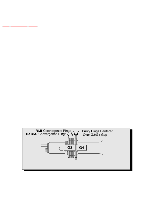
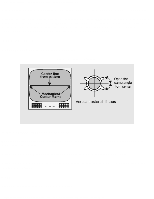
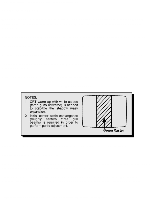
http://tsn.pstc.panasonic.com/viewing/NA/CT-36SL13G/SVC/s1200000000x.html PURITY ADJUSTMENT When the receiver is in the serviceman mode for making electronic adjustments, press the RECALL button on the remote control to enter purity check. (See the service adjustments electronic controls procedure). Operate the receiver for 60 minutes using the first purity check field (white screen) to stabilize the CRT. Fully degauss the receiver by using an external degaussing coil. Press the RECALL button on the remote control again until the purity check (green screen) appears. Loosen the deflection yoke clamp screw and move the deflection yoke back as close to the purity magnet as possible. Adjust the purity rings to set the vertical green raster precisely at the center of the screen. Green raster adjustment Slowly move the deflection yoke forward until the best overall green screen is displayed. Tighten the deflection yoke clamp screw. Press the RECALL button on the remote control again until the purity check blue and red screens appear and observe that good purity is obtained on each respective field. Press the RECALL button on the remote control again until purity check (white screen) appears. Observe the screen for uniform white. If purity has not been achieved, repeat the above procedure. http://tsn.pstc.panasonic.com/viewing/NA/CT-36SL13G/SVC/s1200000000x.html (4 of 5)05.12.2008 0:01:52
-
 1
1 -
2
-
3
-
4
-
5
-
6
-
7
-
8
-
9
-
10
-
11
-
12
-
13
-
14
-
15
-
16
-
17
-
18
-
19
-
20
-
21
-
22
-
23
-
24
-
25
-
26
-
27
-
28
-
29
-
30
-
31
-
32
-
33
-
34
-
35
-
 36
36 -
 37
37 -
 38
38 -
 39
39 -
 40
40 -
 41
41 -
 42
42 -
 43
43 -
 44
44 -
 45
45 -
 46
46 -
47
-
48
-
49
-
50
-
51
-
52
-
53
-
54
-
55
-
56
-
57
-
58
-
59
-
60
-
61
-
62
-
63
-
64
-
65
-
66
-
67
-
68
-
69
-
70
-
71
-
72
-
73
-
74
-
75
-
76
-
77
-
78
-
79
-
80
-
81
-
82
-
83
-
84
-
85
-
86
-
87
-
88
-
89
-
90
-
91
-
92
-
93
-
94
-
95
-
96
-
97
-
98
-
99
-
100
-
101
-
102
-
103
-
104
-
105
-
106
-
107
-
108
-
109
-
110
-
111
-
112
-
113
-
114
-
115
-
116
-
117
-
118
-
119
-
120
-
121
-
122
-
123
-
124
-
125
-
126
-
127
-
128
-
129
-
130
-
131
-
132
-
133
-
134
-
135
-
136
-
137
-
138
-
139
-
140
-
141
-
142
-
143
-
144
-
145
-
146
-
147
-
148
-
149
-
150
-
151
-
152
-
153
-
154
-
155
-
156
-
157
-
158
-
159
-
160
-
161
-
162
-
163
-
164
-
165
-
166
-
167
-
168
-
169
-
170
-
171
-
172
-
173
-
174
-
175
-
176
-
177
-
178
-
179
-
180
-
181
-
182
-
183
-
184
-
185
-
186
-
187
 |
 |
