Panasonic DMC-TZ4S Digital Still Camera - Page 22
Using SETUP menu - review
 |
UPC - 037988987689
View all Panasonic DMC-TZ4S manuals
Add to My Manuals
Save this manual to your list of manuals |
Page 22 highlights
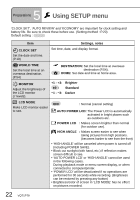
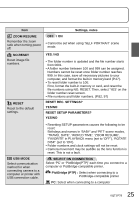
5 Preparations Using SETUP menu 'CLOCK SET', 'AUTO REVIEW' and 'ECONOMY' are important for clock setting and battery life. Be sure to check these before use. (Setting method : P.20) Default setting : Item CLOCK SET Set the date and time. (P.19) Settings, notes Set time, date, and display format. WORLD TIME Set the local time at an overseas destination. (P.54) MONITOR Adjust the brightness of the LCD monitor (7 levels). DESTINATION: Set the local time at overseas destination (P.54). HOME: Set date and time at home area. +1 - +3: Brighter ±0 : Standard −1 - −3: Darker LCD MODE Make LCD monitor easier to see. OFF : Normal (cancel setting) AUTO POWER LCD: The Power LCD is automatically activated in bright places such as outdoors etc. POWER LCD : Makes screen brighter than normal (for outdoor use). HIGH ANGLE : Makes screen easier to see when taking pictures from high positions. (becomes harder to see from the front) • 'HIGH ANGLE' will be canceled when power is turned off (including POWER SAVE). • Block out sunlight (with hand, etc.) if reflection makes screen difficult to see. • 'AUTO POWER LCD' or 'HIGH ANGLE' cannot be used in the following cases. During playback mode or menu screen display, or when connected to computer/printer. • 'POWER LCD' will be deactivated if no operations are performed for 30 seconds while recording. (Brightness can be restored by pressing any button) • Brightness/color of screen in 'LCD MODE' has no effect on pictures recorded. 22 VQT1P79
-
 1
1 -
2
-
3
-
4
-
5
-
6
-
7
-
8
-
9
-
10
-
11
-
12
-
13
-
14
-
15
-
16
-
 17
17 -
 18
18 -
 19
19 -
 20
20 -
 21
21 -
 22
22 -
 23
23 -
 24
24 -
 25
25 -
 26
26 -
 27
27 -
28
-
29
-
30
-
31
-
32
-
33
-
34
-
35
-
36
-
37
-
38
-
39
-
40
-
41
-
42
-
43
-
44
-
45
-
46
-
47
-
48
-
49
-
50
-
51
-
52
-
53
-
54
-
55
-
56
-
57
-
58
-
59
-
60
-
61
-
62
-
63
-
64
-
65
-
66
-
67
-
68
-
69
-
70
-
71
-
72
-
73
-
74
-
75
-
76
-
77
-
78
-
79
-
80
-
81
-
82
-
83
-
84
-
85
-
86
-
87
-
88
-
89
-
90
-
91
-
92
-
93
-
94
-
95
-
96
-
97
-
98
-
99
-
100
-
101
-
102
-
103
-
104
-
105
-
106
-
107
-
108
-
109
-
110
-
111
-
112
-
113
-
114
-
115
-
116
 |
 |
