Panasonic DMC-TZ4S Digital Still Camera - Page 81
Connecting with other devices, Using with your PC
 |
UPC - 037988987689
View all Panasonic DMC-TZ4S manuals
Add to My Manuals
Save this manual to your list of manuals |
Page 81 highlights
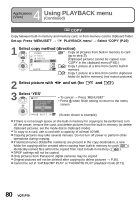
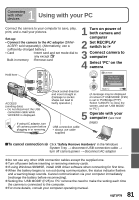
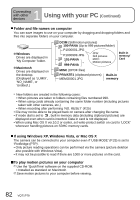
1 Connecting with other devices Using with your PC Connect the camera to your computer to save, play, print, and e-mail your pictures. Set-up: • Connect the camera to the AC adaptor (DMW- AC5PP, sold separately). (Alternatively, use a sufficiently-charged battery.) • Card :Insert card and set mode dial to any except Built-in memory :Remove card 1 Turn on power of both camera and computer 2 Set REC/PLAY switch to 3 Connect camera to computer 4 Select 'PC' on the camera Hold here ACCESS (sending data) • Do not disconnect the USB connection cable while 'ACCESS' is displayed. If using AC adaptor, turn off camera power before plugging in or removing. USB MODE PLEASE SELECT THE USB MODE PictBridge(PTP) PC Check socket direction and insert straight in. (Damage to socket shape can lead to faulty operation.) SELECT SET (A message may be displayed on screen if 'USB MODE' (P.25) is set to 'PictBridge (PTP)'. Select 'CANCEL' to close the screen, and set 'USB MODE' to 'PC'.) 5 Operate with your computer (see next page) USB connection cable • always use cable supplied To cancel connection Click 'Safely Remove Hardware' in the Windows System Tray → disconnect USB connection cable → turn off camera power → disconnect AC adaptor Do not use any other USB connection cables except the supplied one. Turn off power before inserting or removing memory cards. If using Windows 98/98SE, install USB driver software when connecting for first time. When the battery begins to run out during communication, the status indicator flashes and a warning beep sounds. Cancel communication via your computer immediately (recharge the battery before reconnecting). Setting the 'USB MODE' (P.25) to 'PC' remove the need to make the setting each time the camera is connected to the computer. For more details, consult your computer operating manual. 81 VQT1P79
-
 1
1 -
2
-
3
-
4
-
5
-
6
-
7
-
8
-
9
-
10
-
11
-
12
-
13
-
14
-
15
-
16
-
17
-
18
-
19
-
20
-
21
-
22
-
23
-
24
-
25
-
26
-
27
-
28
-
29
-
30
-
31
-
32
-
33
-
34
-
35
-
36
-
37
-
38
-
39
-
40
-
41
-
42
-
43
-
44
-
45
-
46
-
47
-
48
-
49
-
50
-
51
-
52
-
53
-
54
-
55
-
56
-
57
-
58
-
59
-
60
-
61
-
62
-
63
-
64
-
65
-
66
-
67
-
68
-
69
-
70
-
71
-
72
-
73
-
74
-
75
-
 76
76 -
 77
77 -
 78
78 -
 79
79 -
 80
80 -
 81
81 -
 82
82 -
 83
83 -
 84
84 -
 85
85 -
 86
86 -
87
-
88
-
89
-
90
-
91
-
92
-
93
-
94
-
95
-
96
-
97
-
98
-
99
-
100
-
101
-
102
-
103
-
104
-
105
-
106
-
107
-
108
-
109
-
110
-
111
-
112
-
113
-
114
-
115
-
116
 |
 |
