Panasonic HC-X1500 HC-X1500 Advanced Operating Manual - Page 24
Handle unit ([X2000] supplied, [X1500] optional: VW-HU1), Description of Parts
 |
View all Panasonic HC-X1500 manuals
Add to My Manuals
Save this manual to your list of manuals |
Page 24 highlights
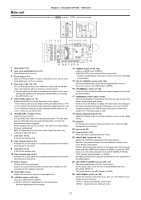
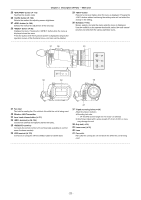
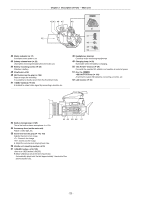
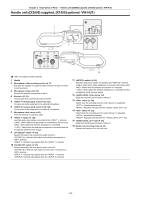
Chapter 2 Description of Parts - Handle unit ([X2000] supplied, [X1500] optional: VW-HU1) Handle unit ([X2000] supplied, [X1500] optional: VW-HU1) 1 2 3 4 7 89 10 11 65 15 14 13 12 A With a microphone holder attached 1 Handle 2 Microphone holder mounting section (l 33) Attaches the supplied microphone holder with the microphone holder mounting screws. 3 Microphone holder (l 33, 35) Secures the external microphone in place. 4 Buckle (l 33, 35) Used to open and close the microphone holder. 5 terminal (XLR, 3-pin) (l 35, 125) Connects an audio equipment or an external microphone. 6 terminal (XLR, 3-pin) (l 35, 125) Connects an audio equipment or an external microphone. 7 Microphone cable clamp (l 35) Fixes the external microphone cable. 8 switch (l 126) Switches audio input signals connected to the terminal. : Select when audio equipment is connected by the line input. : Select when the external microphone is connected. : Select when the external microphone is connected and the microphone needs a power supply. 9 CH1 SELECT switch (l 125) Selects the audio to be recorded on audio channel 1. : Records left audio from the built-in microphone or terminal. : Records input signals from the terminal. 10 CH2 SELECT switch (l 125) Selects the audio to be recorded on audio channel 2. : Records right audio from the built-in microphone or terminal. : Records input signals from the terminal. : Records input signals from the terminal. 16 11 switch (l 126) Switches audio input signals connected to the terminal. : Select when audio equipment is connected by the line input. : Select when the external microphone is connected. : Select when the external microphone is connected and the microphone needs a power supply. 12 dial (l 126) Adjust the recording level of audio channel 2. 13 switch (l 126) Selects how the recording level for audio channel 2 is adjusted. : Adjusted automatically. : Adjusted manually with the dial. 14 switch (l 126) Selects how the recording level for audio channel 1 is adjusted. : Adjusted automatically. : Adjusted manually with the dial. 15 dial (l 126) Adjust the recording level of audio channel 1. 16 Handle unit mounting screw (l 33) Secures the handle unit to the main unit. - 24 -
-
 1
1 -
2
-
3
-
4
-
5
-
6
-
7
-
8
-
9
-
10
-
11
-
12
-
13
-
14
-
15
-
16
-
17
-
18
-
 19
19 -
 20
20 -
 21
21 -
 22
22 -
 23
23 -
 24
24 -
 25
25 -
 26
26 -
 27
27 -
 28
28 -
 29
29 -
30
-
31
-
32
-
33
-
34
-
35
-
36
-
37
-
38
-
39
-
40
-
41
-
42
-
43
-
44
-
45
-
46
-
47
-
48
-
49
-
50
-
51
-
52
-
53
-
54
-
55
-
56
-
57
-
58
-
59
-
60
-
61
-
62
-
63
-
64
-
65
-
66
-
67
-
68
-
69
-
70
-
71
-
72
-
73
-
74
-
75
-
76
-
77
-
78
-
79
-
80
-
81
-
82
-
83
-
84
-
85
-
86
-
87
-
88
-
89
-
90
-
91
-
92
-
93
-
94
-
95
-
96
-
97
-
98
-
99
-
100
-
101
-
102
-
103
-
104
-
105
-
106
-
107
-
108
-
109
-
110
-
111
-
112
-
113
-
114
-
115
-
116
-
117
-
118
-
119
-
120
-
121
-
122
-
123
-
124
-
125
-
126
-
127
-
128
-
129
-
130
-
131
-
132
-
133
-
134
-
135
-
136
-
137
-
138
-
139
-
140
-
141
-
142
-
143
-
144
-
145
-
146
-
147
-
148
-
149
-
150
-
151
-
152
-
153
-
154
-
155
-
156
-
157
-
158
-
159
-
160
-
161
-
162
-
163
-
164
-
165
-
166
-
167
-
168
-
169
-
170
-
171
-
172
-
173
-
174
-
175
-
176
-
177
-
178
-
179
-
180
-
181
-
182
-
183
-
184
-
185
-
186
-
187
-
188
-
189
-
190
-
191
-
192
-
193
-
194
-
195
-
196
-
197
-
198
-
199
-
200
-
201
-
202
-
203
-
204
 |
 |
