Panasonic KX-MB2030 User Manual - Page 41
Sending a fax manually
 |
View all Panasonic KX-MB2030 manuals
Add to My Manuals
Save this manual to your list of manuals |
Page 41 highlights
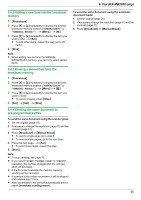
6. Fax (KX-MB2030 only) 6.1 Sending a fax manually 6. . Fax (KX-MB2030 only) 6.1.1 Using the scanner glass To select the resolution 1. Press MResolutionN repeatedly. - "STANDARD": For normal-sized characters. - "FINE": For small-sized characters. By using the scanner glass, you can send a page from booklets or small size paper. - "SUPER FINE": For very small-sized characters. - "PHOTO": For photographs, shaded drawings, etc. 2. MSetN R Using the "FINE", "SUPER FINE" and "PHOTO" settings will increase transmission time. To select the contrast Adjust this setting depending on the darkness or lightness of the document. 5 levels (low to high) are available. Press MContrastN repeatedly. A MSetN Note: R You can save the previous contrast setting (feature #462 on page 58). MFaxN MRedialN MSetN MStartN MContrastN MQuick ScanN MResolutionN 1 If the MFaxN light is OFF, turn it ON by pressing MFaxN. 2 Set the original (page 19). 3 If necessary, change the resolution and contrast according to the type of document. R To select the resolution, see page 41. R To select the contrast, see page 41. 4 Dial the fax number. R To send a single page, go to step 7. R To send multiple pages, go to the next step. 5 Press MQuick ScanN to scan the document into memory. R Wait until "SCAN:PRESS SET" "SEND:PRESS START" is displayed. 6 Place the next page on the scanner glass. A MSetN R To send more pages, repeat this step. 7 MStartN Note: R To stop sending, see page 72. R You can change the default operation mode (feature #463 on page 58) and the timer before returning to the default operation mode (feature #464 on page 58). To redial the last number MRedialN R If the line is busy, the unit will automatically redial the number 1 time. Note: R To stop sending, see page 72. Reserving the fax transmission (Dual Access) You can reserve a fax transmission even when the unit is just receiving a fax or sending a fax from memory. - Up to 3 reservations when sending - Up to 4 reservations when receiving 1. Set the original during fax reception or fax memory transmission. 2. Enter the fax number using the dial keypad, one-touch dial or phonebook. 3. When using the scanner glass, press MQuick ScanN. The unit will scan 1 page. Place the next document on the scanner glass and press MSetN. Repeat this until all the documents are scanned, then press MStartN. When using the automatic document feeder, press MStartN. R If the document exceeds the memory capacity, the reservation for that document will be canceled. You must send the entire document manually. Printing a confirmation report A confirmation report provides you with a printed record of transmission results. To print the confirmation reports, make sure that feature #401 is activated (page 59). For an explanation of the messages, see page 73. Printing a journal report A journal report provides you with a printed record of the 30 most recent faxes. To print it manually, see page 96. To print it automatically after every 30 new 41
-
 1
1 -
2
-
3
-
4
-
5
-
6
-
7
-
8
-
9
-
10
-
11
-
12
-
13
-
14
-
15
-
16
-
17
-
18
-
19
-
20
-
21
-
22
-
23
-
24
-
25
-
26
-
27
-
28
-
29
-
30
-
31
-
32
-
33
-
34
-
35
-
 36
36 -
 37
37 -
 38
38 -
 39
39 -
 40
40 -
 41
41 -
 42
42 -
 43
43 -
 44
44 -
 45
45 -
 46
46 -
47
-
48
-
49
-
50
-
51
-
52
-
53
-
54
-
55
-
56
-
57
-
58
-
59
-
60
-
61
-
62
-
63
-
64
-
65
-
66
-
67
-
68
-
69
-
70
-
71
-
72
-
73
-
74
-
75
-
76
-
77
-
78
-
79
-
80
-
81
-
82
-
83
-
84
-
85
-
86
-
87
-
88
-
89
-
90
-
91
-
92
-
93
-
94
-
95
-
96
-
97
-
98
-
99
-
100
-
101
-
102
-
103
-
104
-
105
-
106
-
107
-
108
-
109
-
110
-
111
-
112
-
113
-
114
-
115
-
116
 |
 |
