Panasonic KX-TA82492 Installation Manual - Page 31
Wall Mounting - support
 |
UPC - 037988851416
View all Panasonic KX-TA82492 manuals
Add to My Manuals
Save this manual to your list of manuals |
Page 31 highlights
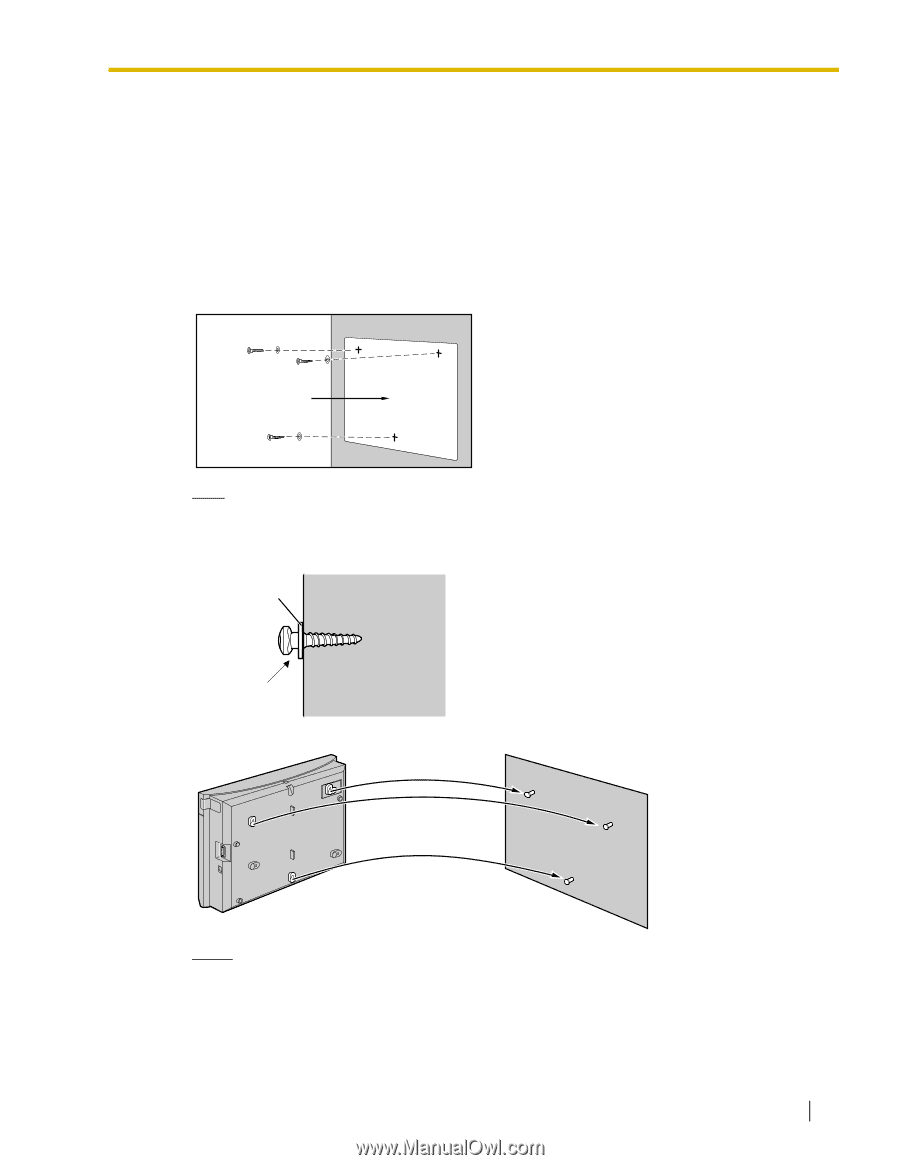
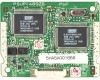
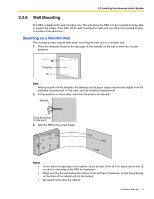
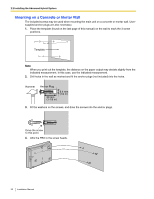
2.2 Installing the Advanced Hybrid System 2.2.6 Wall Mounting The PBX is designed for wall mounting only. The wall where the PBX is to be mounted must be able to support the weight of the PBX. When wall mounting the main unit, use either the included screws, or screws of the same size. Mounting on a Wooden Wall The included screws may be used when mounting the main unit on a wooden wall. 1. Place the template (found on the last page of this manual) on the wall to mark the 3 screw positions. Template Note When you print out the template, the distance on the paper output may deviate slightly from the indicated measurement. In this case, use the indicated measurement. 2. Fit the washers on the screws, and drive the screws into the wall. Washer Drive the screw to this point. 3. Affix the PBX to the screw heads. Notes • • • Do not block the openings of the cabinet. Leave at least 20 cm (8 in) of space above and 10 cm (4 in) to the sides of the PBX for ventilation. Make sure that the wall behind the cabinet is flat and free of obstacles, so that the openings on the back of the cabinet will not be blocked. Be careful not to drop the cabinet. Installation Manual 31
-
 1
1 -
2
-
3
-
4
-
5
-
6
-
7
-
8
-
9
-
10
-
11
-
12
-
13
-
14
-
15
-
16
-
17
-
18
-
19
-
20
-
21
-
22
-
23
-
24
-
25
-
 26
26 -
 27
27 -
 28
28 -
 29
29 -
 30
30 -
 31
31 -
 32
32 -
 33
33 -
 34
34 -
 35
35 -
 36
36 -
37
-
38
-
39
-
40
-
41
-
42
-
43
-
44
-
45
-
46
-
47
-
48
-
49
-
50
-
51
-
52
-
53
-
54
-
55
-
56
-
57
-
58
-
59
-
60
-
61
-
62
-
63
-
64
-
65
-
66
-
67
-
68
-
69
-
70
-
71
-
72
-
73
-
74
-
75
-
76
-
77
-
78
-
79
-
80
-
81
-
82
-
83
-
84
-
85
-
86
-
87
-
88
 |
 |