Panasonic KX-TA82492 Installation Manual - Page 87
Template For Wall Mounting
 |
UPC - 037988851416
View all Panasonic KX-TA82492 manuals
Add to My Manuals
Save this manual to your list of manuals |
Page 87 highlights
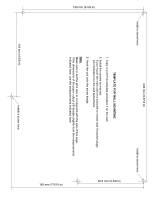
92.5 mm (3-5/8 in) Install a screw here. 236 mm (9-5/16 in) Install a screw here. TEMPLATE FOR WALL MOUNTING 1. Copy or print this template and place it on the wall. 2. Install the screws as marked. If you mount the main unit on a concrete or mortar wall, fit anchor plugs (not included) into the wall beforehand. 3. Hook the unit onto the screw heads. Note Make sure to set the print size to correspond with the size of this page. If the dimensions of the paper output still deviate slightly from the measurements indicated here, use the measurements indicated here. 169 mm (6-5/8 in) 185 mm (7-5/16 in) 118 mm (4-5/8 in) Install a screw here.
-
 1
1 -
2
-
3
-
4
-
5
-
6
-
7
-
8
-
9
-
10
-
11
-
12
-
13
-
14
-
15
-
16
-
17
-
18
-
19
-
20
-
21
-
22
-
23
-
24
-
25
-
26
-
27
-
28
-
29
-
30
-
31
-
32
-
33
-
34
-
35
-
36
-
37
-
38
-
39
-
40
-
41
-
42
-
43
-
44
-
45
-
46
-
47
-
48
-
49
-
50
-
51
-
52
-
53
-
54
-
55
-
56
-
57
-
58
-
59
-
60
-
61
-
62
-
63
-
64
-
65
-
66
-
67
-
68
-
69
-
70
-
71
-
72
-
73
-
74
-
75
-
76
-
77
-
78
-
79
-
80
-
81
-
 82
82 -
 83
83 -
 84
84 -
 85
85 -
 86
86 -
 87
87 -
 88
88
 |
 |

TEMPLATE FOR WALL MOUNTING
Copy or print this template and place it on the wall.
Install the screws as marked.
If you mount the main unit on a concrete or mortar wall, fit anchor plugs
(not included) into the wall beforehand.
Hook the unit onto the screw heads.
1.
2.
3.
236 mm (9-5/16 in)
118 mm (4-5/8 in)
185 mm (7-5/16 in)
169 mm (6-5/8 in)
92.5 mm (3-5/8 in)
Install a screw here.
Install a screw here.
Install a screw here.
Make sure to set the print size to correspond with the size of this page.
If the dimensions of the paper output still deviate slightly from the measurements
indicated here, use the measurements indicated here.
Note